Tag Archives: forms

Remote Learning in Computing Science⤴

from @ Team MIEE Scotland

Bitmoji image of Miss Mutter and twitter name @FHSComputing
Hello, I am a Computing Science teacher at Falkirk High school, this post is about my experience of moving to remote learning and my journey through it until the summer break. I have been an MIEExpert for 3 years and gained MIE Trainer status during this period of remote learning.

Before moving to remote learning Microsoft Teams was used by a small number of teachers across our school. I lead the schools eLearning staff working group and had been providing training to these colleagues on using the main features of Glow (Teams, OneNote Notebook, Forms, Sway, O365 and Immersive Reader) that we thought would be most useful in our setting. We had planned to roll this training out across the entire school this year with eLearning staff and our pupil Digital Leaders supporting and leading the way. This did happen, just not how we had planned.

In the two weeks prior to starting remote learning I provided training sessions to staff on the basics of using Glow and Teams so that all staff had a grounding on it and could use this whilst working from home. I also synced all Glow pupil groups within our school to enable staff to quickly create the teaching groups and teams they needed. All Staff rose to the challenge and engaged with digital learning tools in a way that I have never seen before in my 20 year teaching career. I remember one of the last things I said to my Head Teacher was that “My silver lining out of all of this will be the staff engagement with Digital Tools and Technology for learning.” My view has slightly changed on that front – I’ll explain later.

Graphic showing Glow and Digital Tools used during remote learning
Overview of my original use of Teams and Digital Tools

I have been using OneNote Notebook for a number of years and then Teams when it launched in Glow with most of my classes. I had used O365, Immersive Reader, Forms and Sway before but not extensively. Additionally, some of the tools I’m using now I had never heard of before remote learning.

When setting up my Teams I wanted to make things as easy as possible for pupils to locate work and navigate their virtual learning space. With this in mind, the first assignment I set all of my pupils was a ThingLink on Navigating our Team. This gave them pictures of their Team with links to explain each part so that they could gain an understanding of how our virtual classroom was laid out and would operate. ThingLink is a digital tool that I had not heard of prior to remote learning but is one I will definitely continue to use. I had great feedback both from pupils and staff on it and great engagement from both when using it.

Screen clipping of the Navigation ThingLInk
ThingLink screen clipping from pupil Teams Navigation Assignment


screen clipping of Team Channels
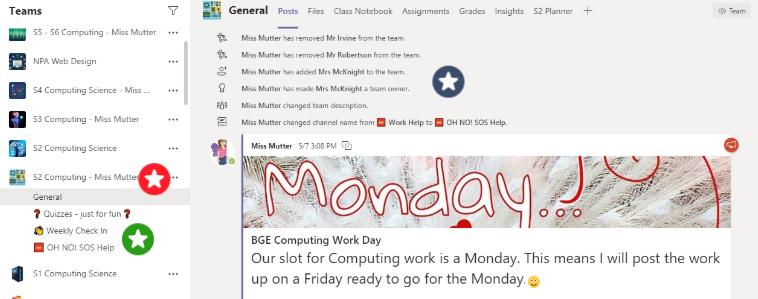
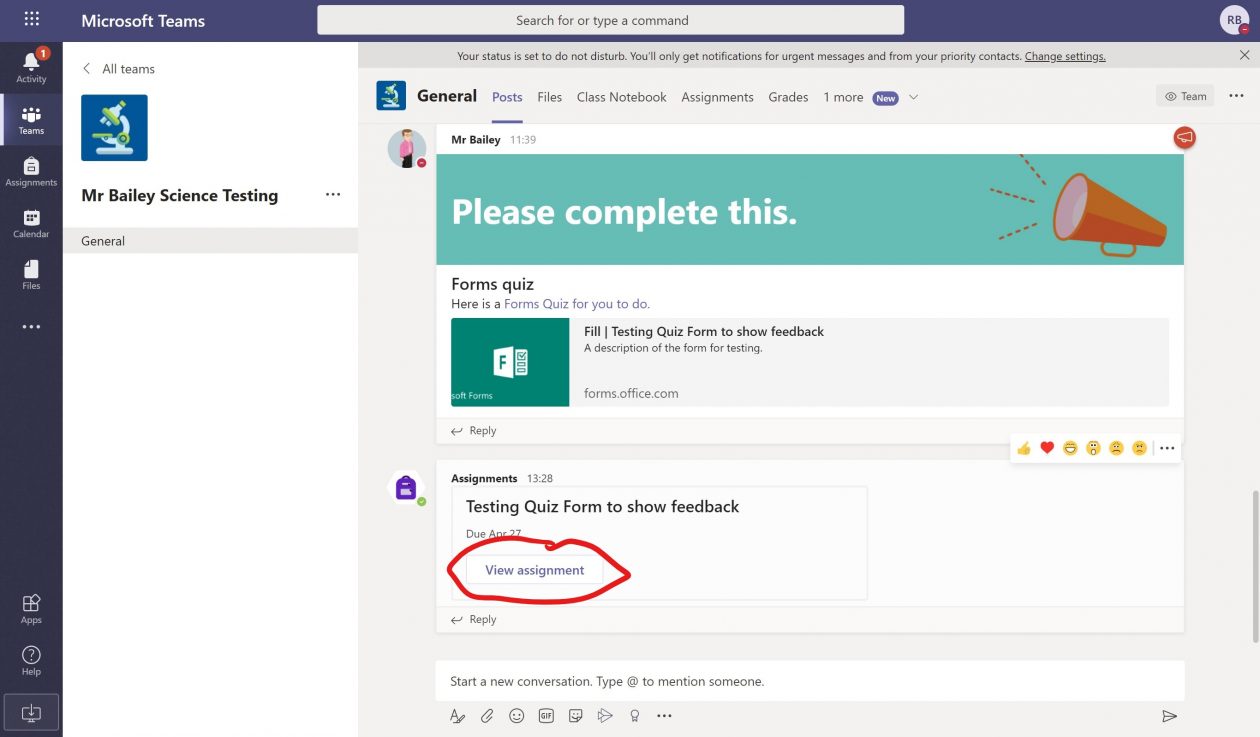
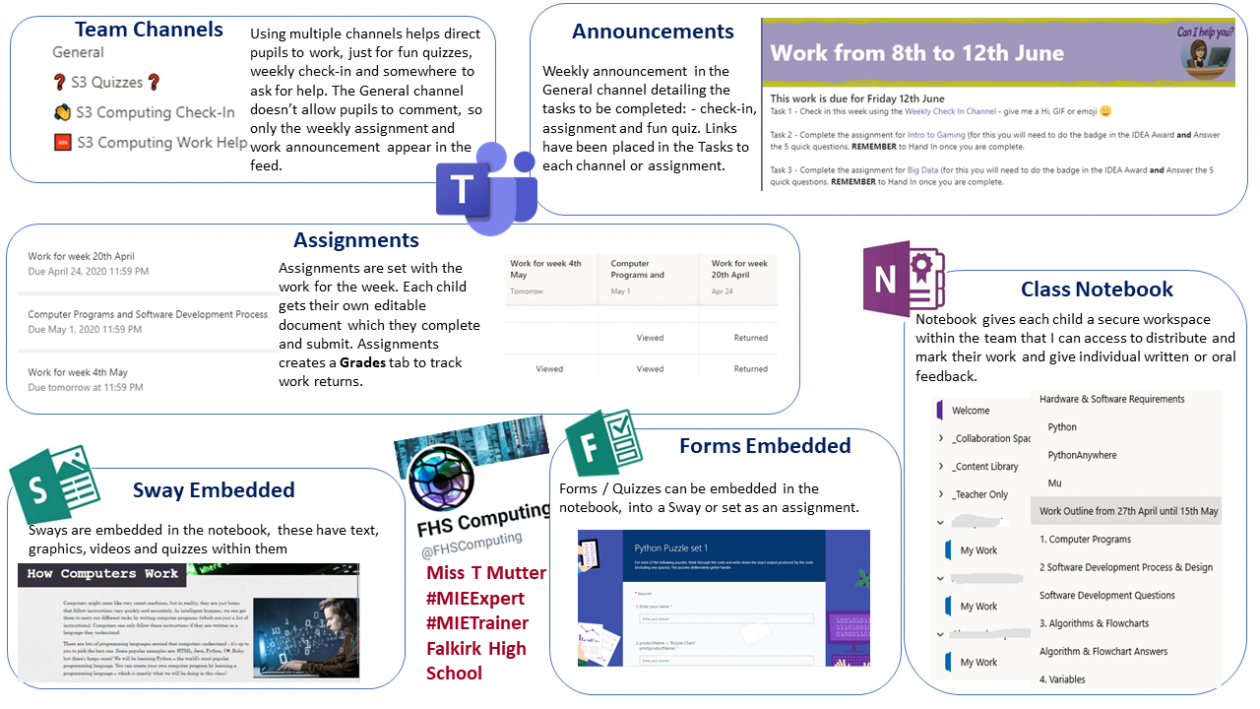
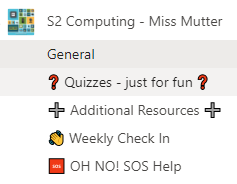
All of my Teams have been set up the same way. I have added different channels to hopefully indicate what each one is being used for rather than all communications being in the one General channel. It can otherwise quickly become clogged up making it difficult to locate work, etc. I also set my General channel for staff only commenting as this is where I post Assignments and Announcements to. This should mean that it is easy for pupils to see the weekly work and important announcements.

screen clipping showing a weekly work announcement in my team

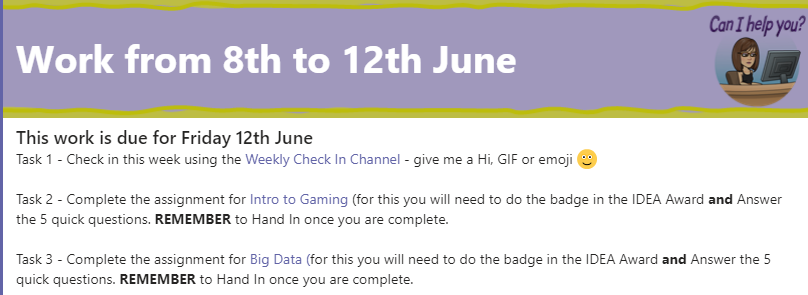
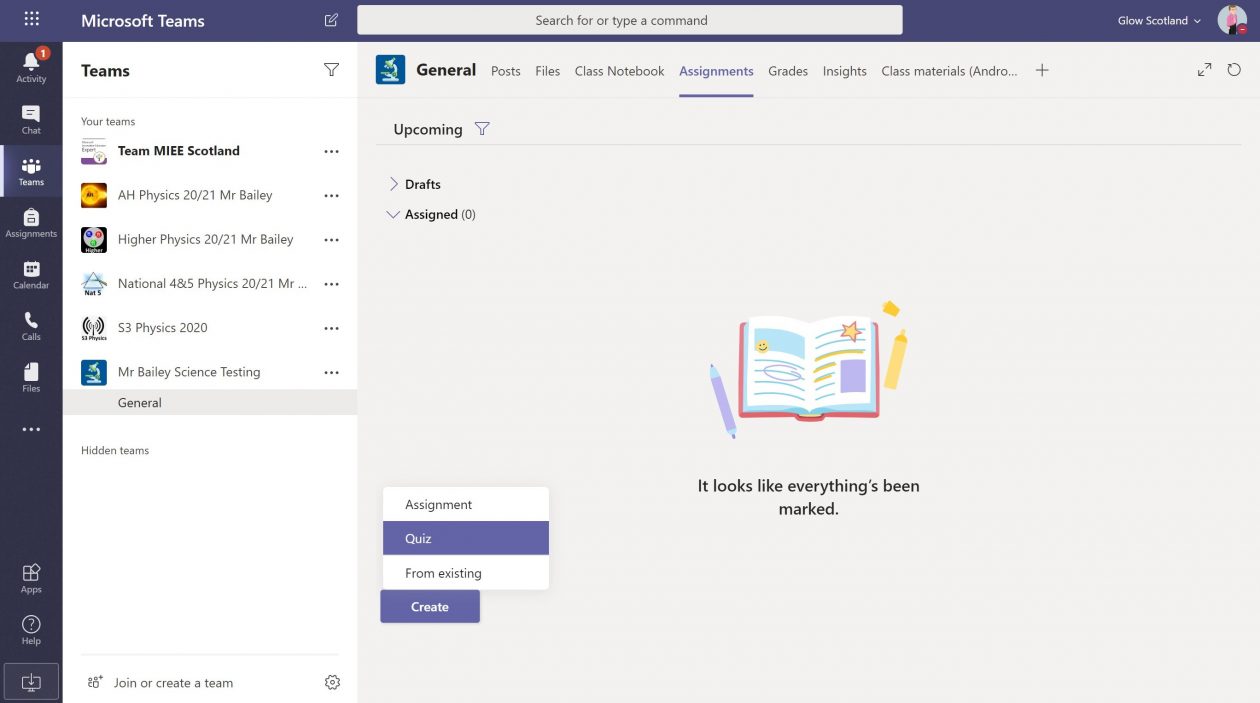
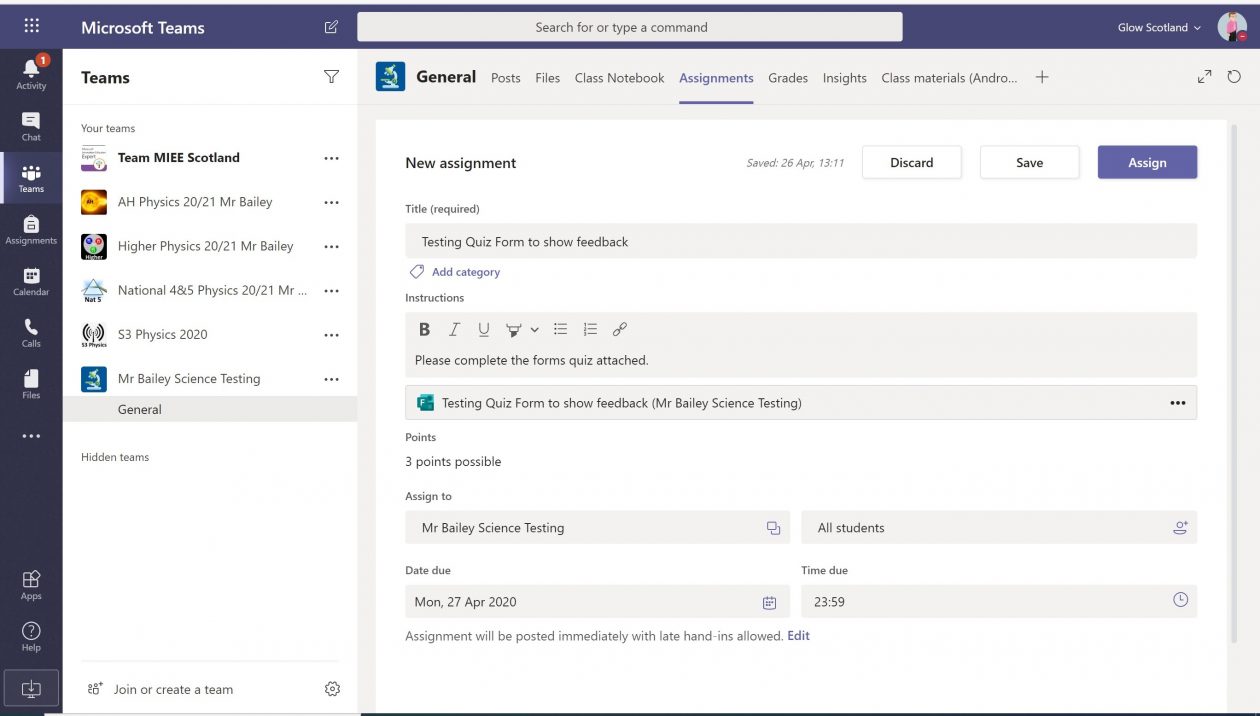
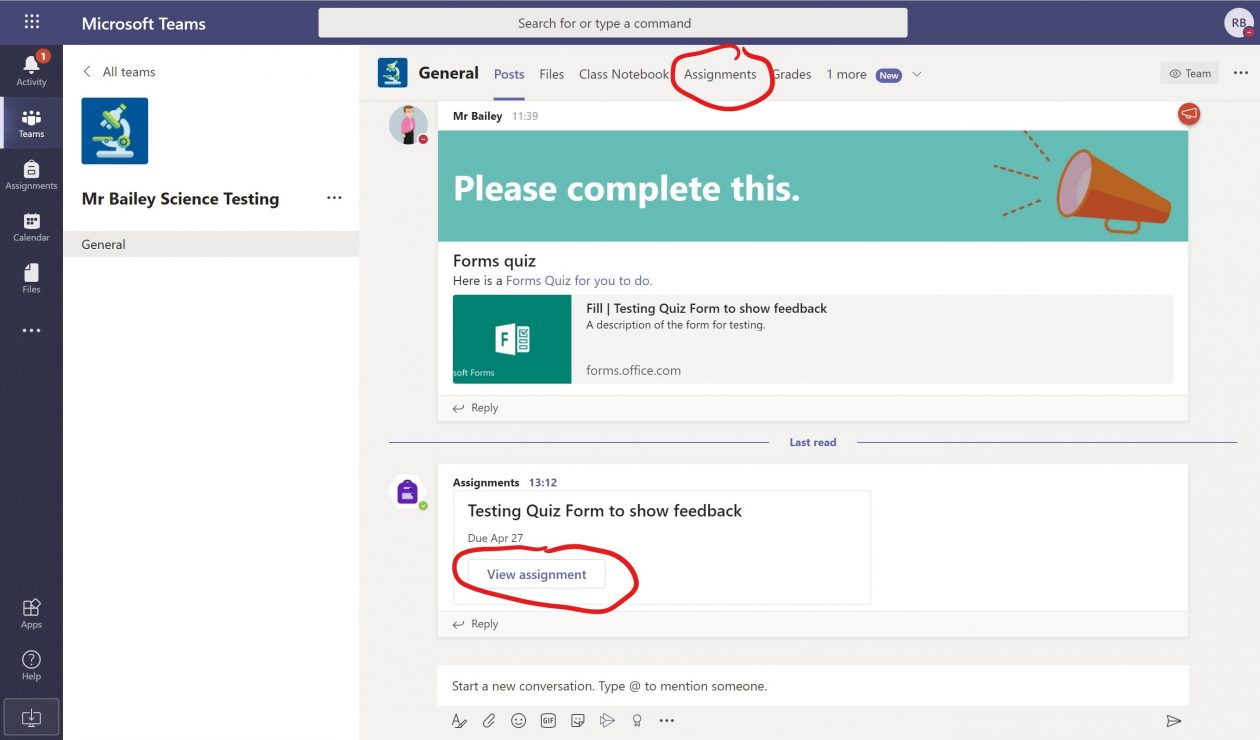
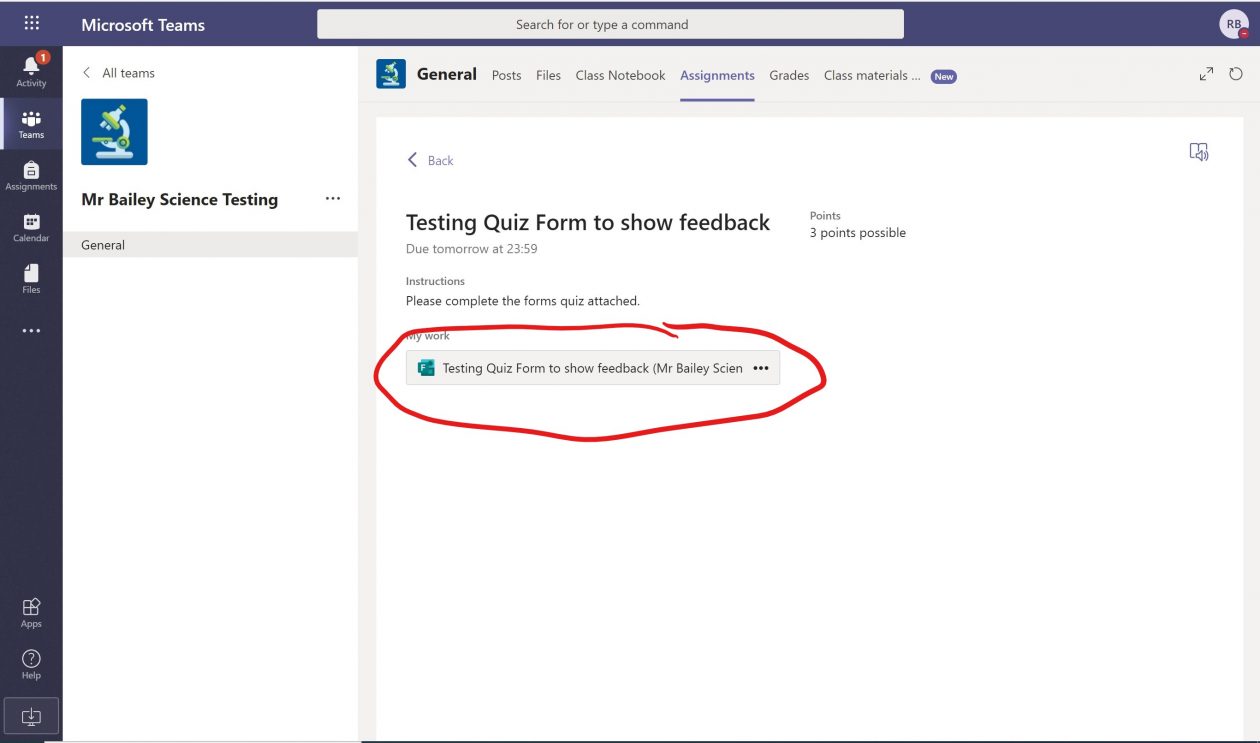
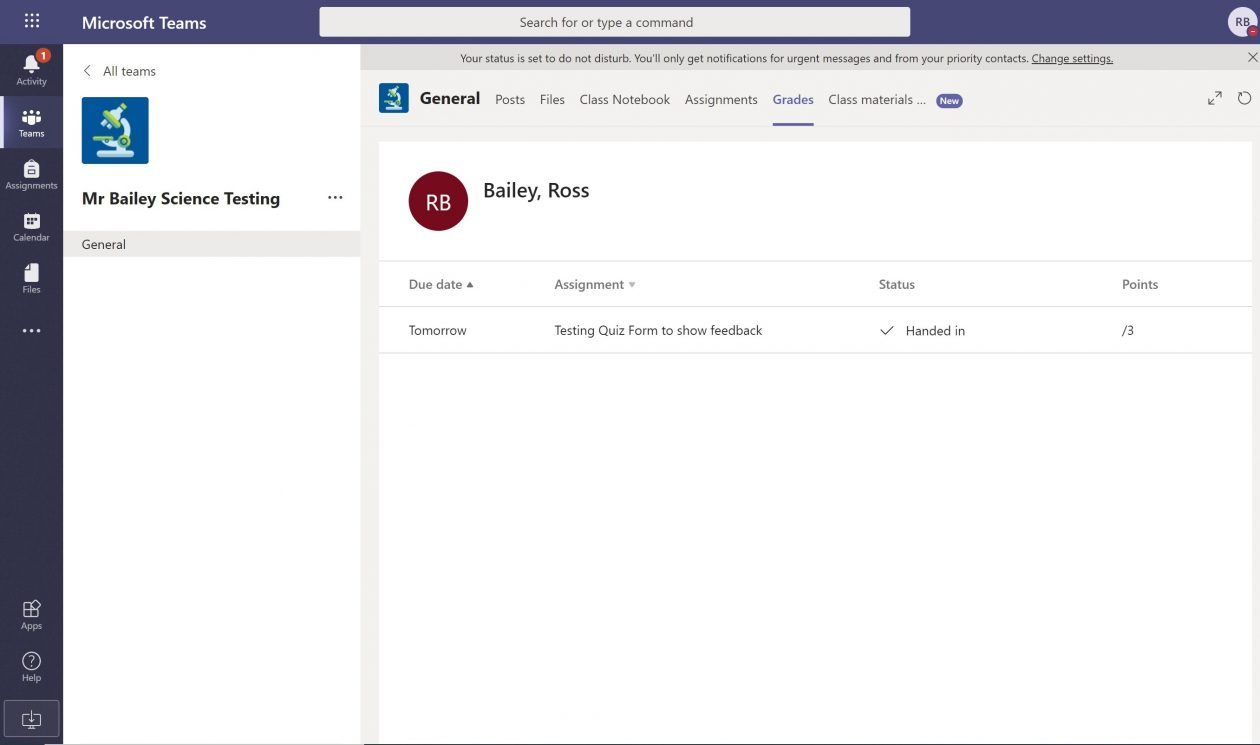
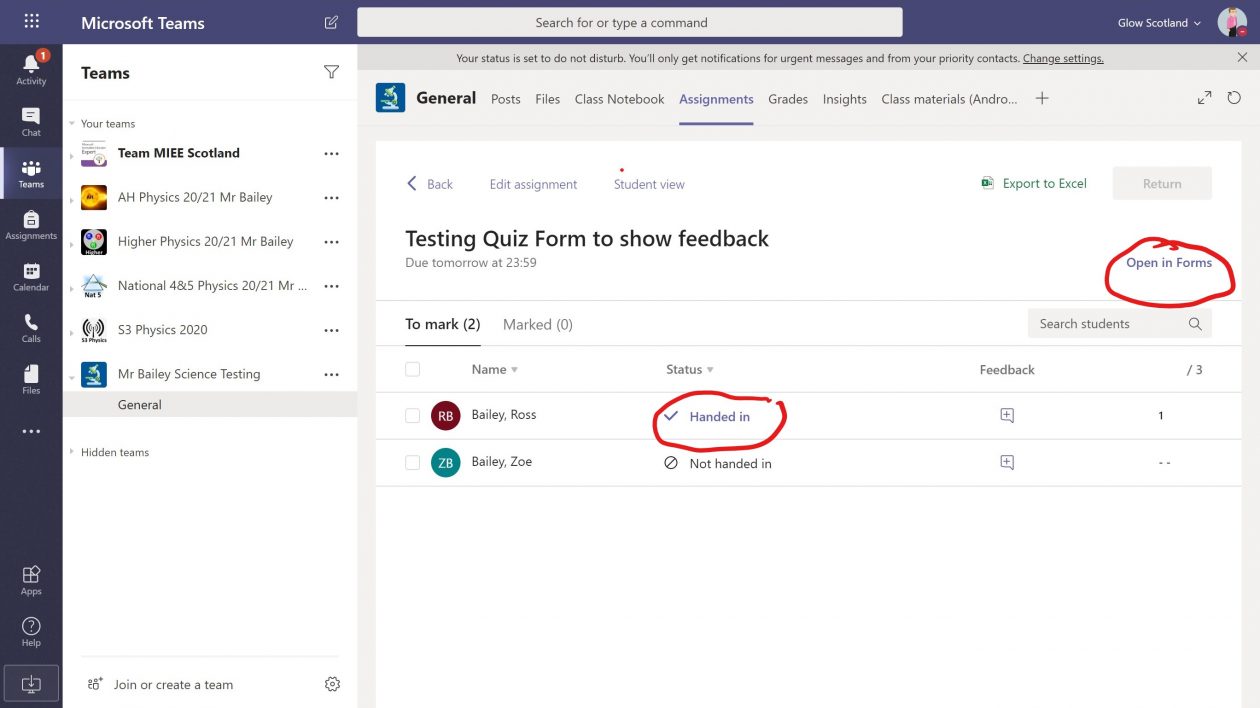
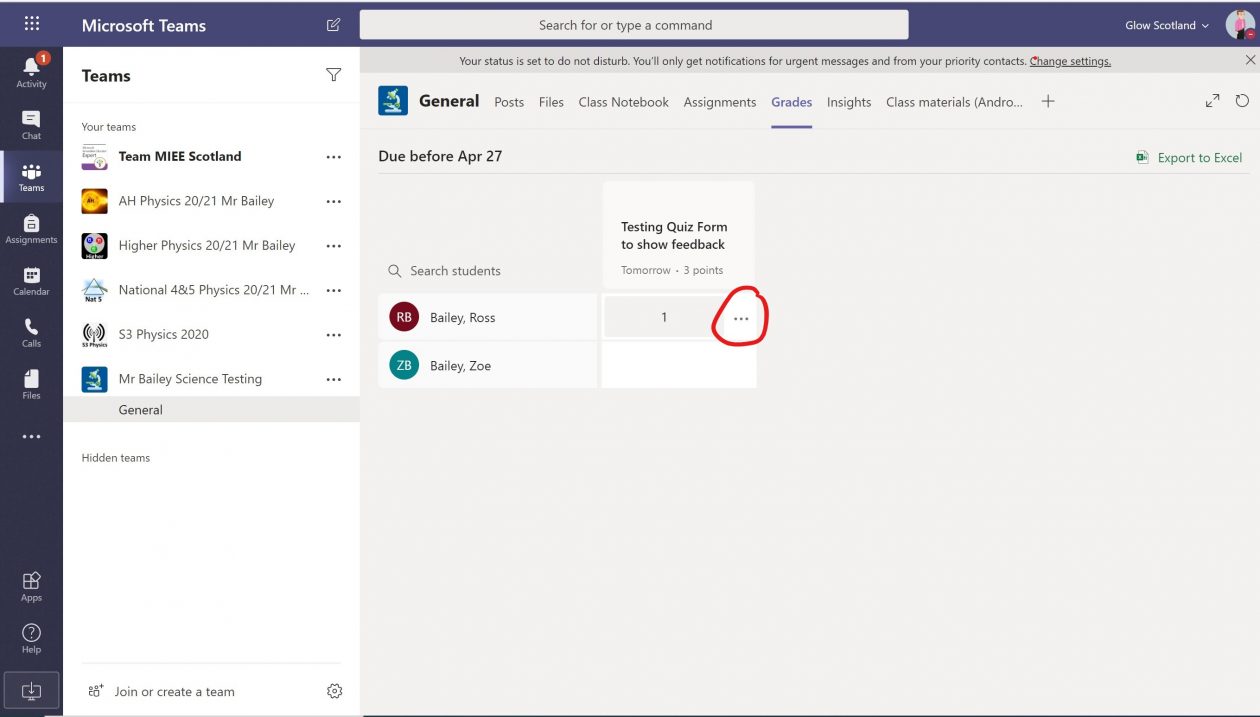
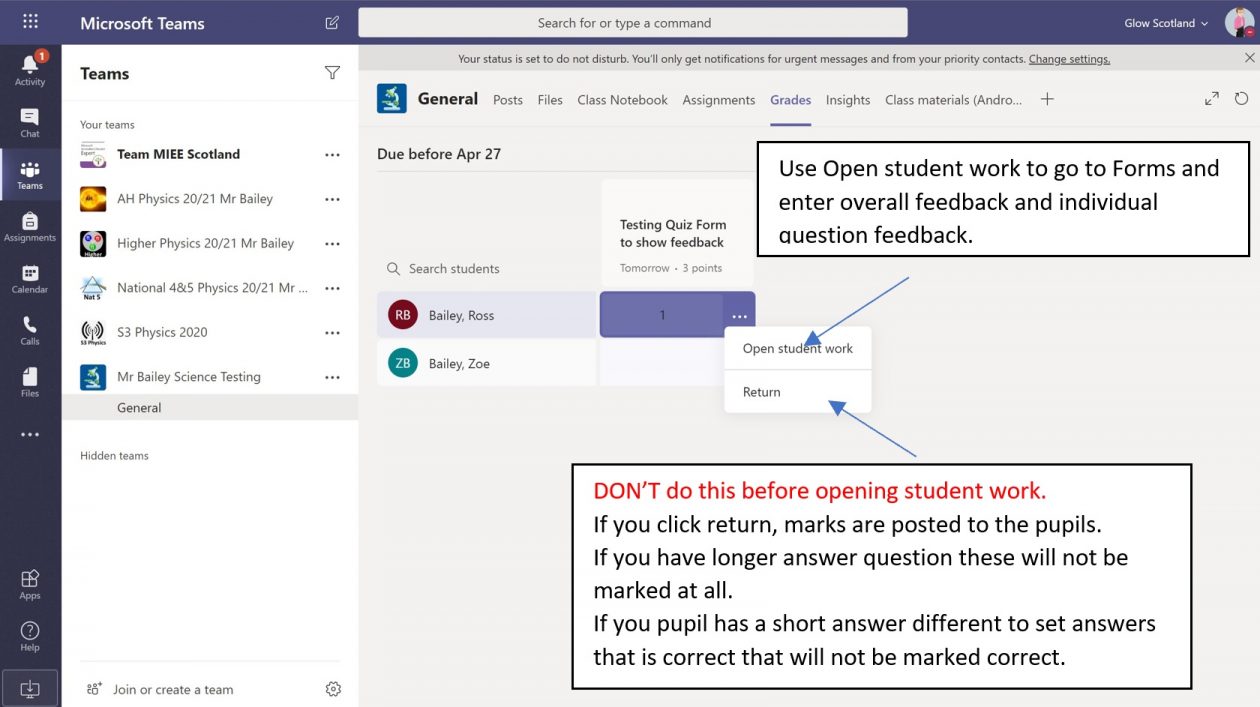
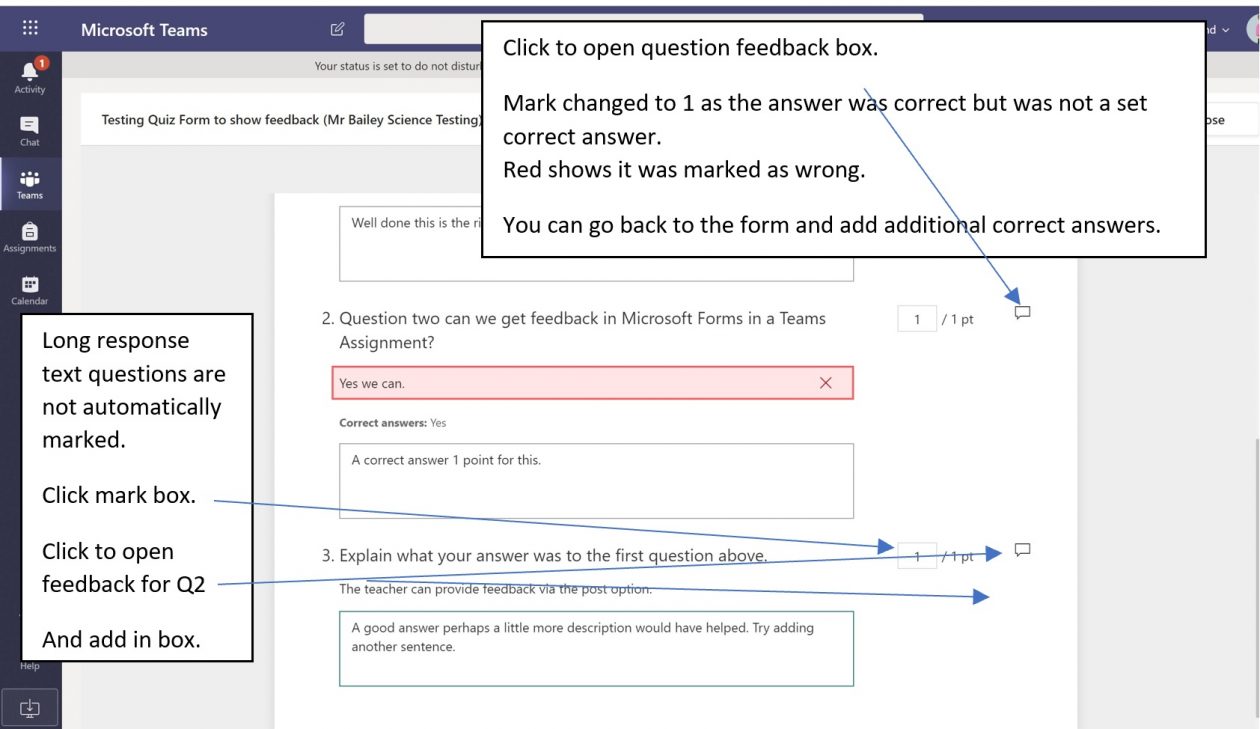
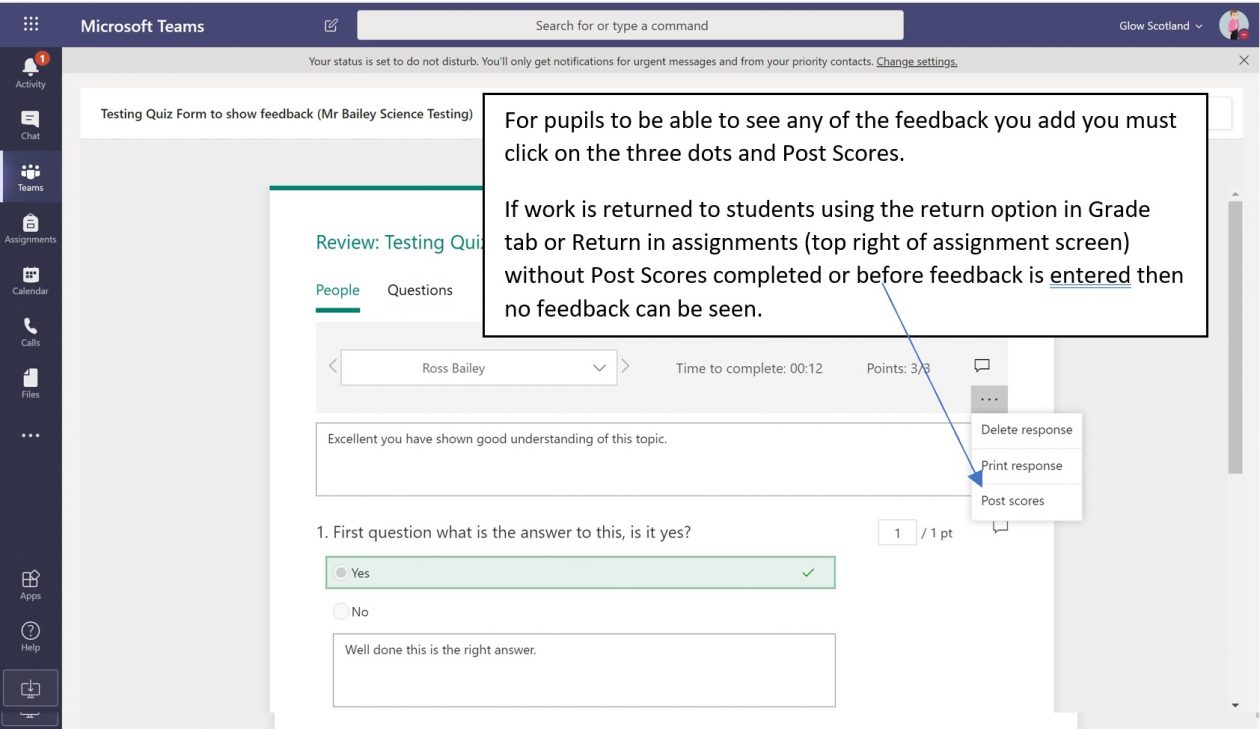
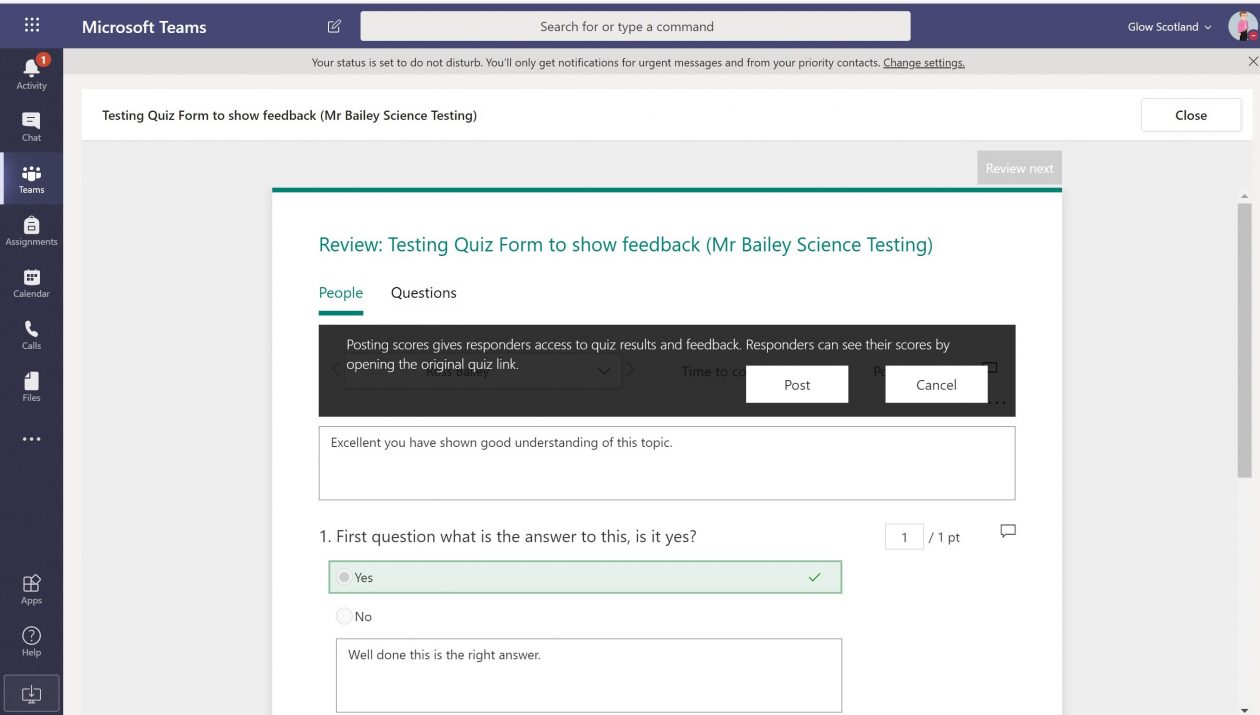
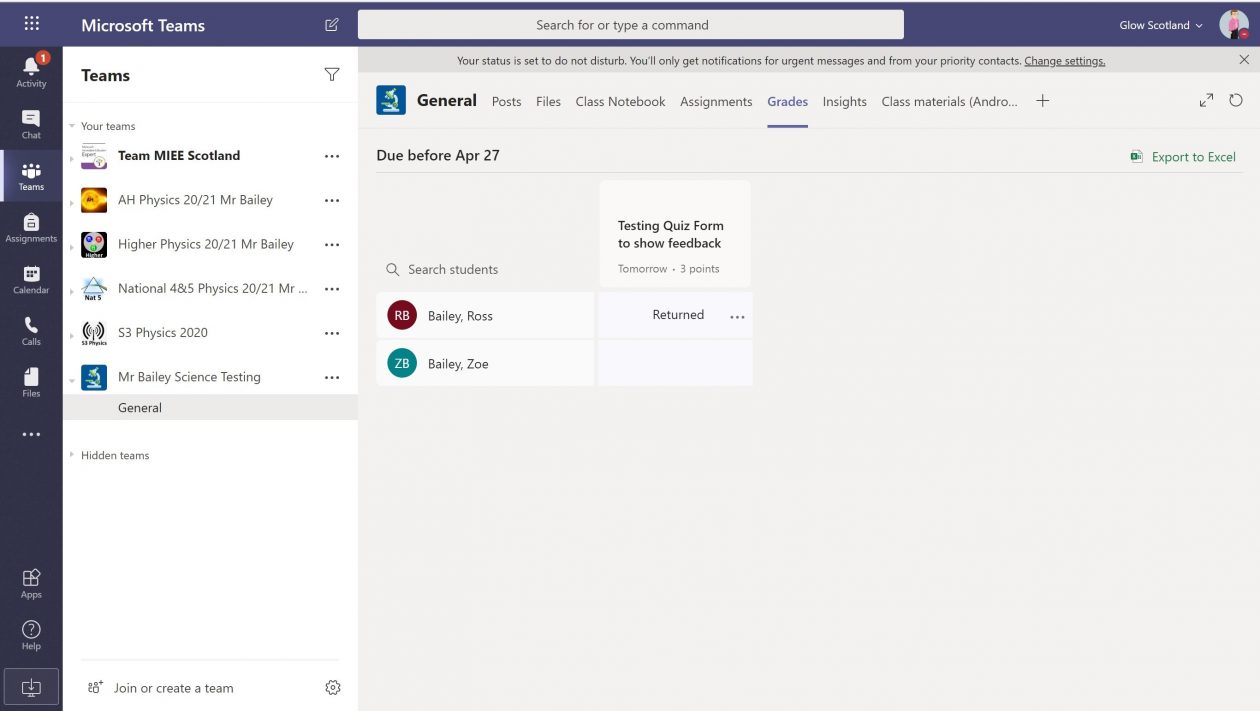
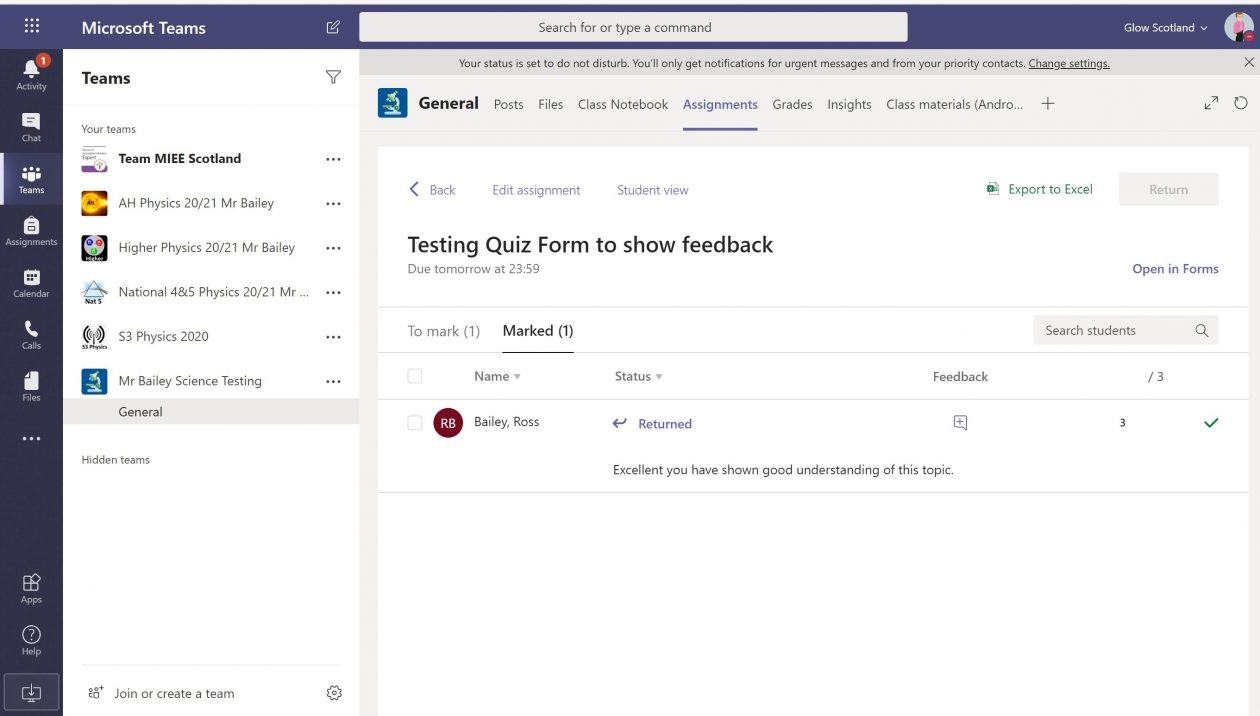
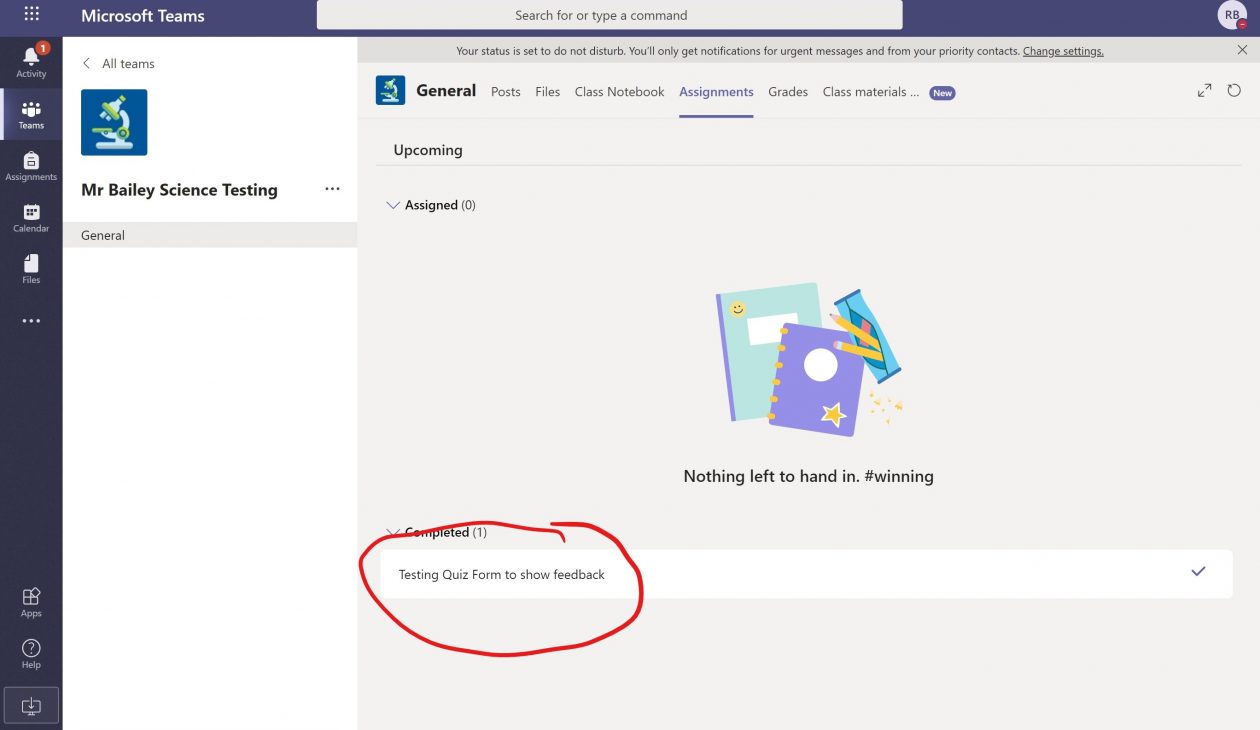
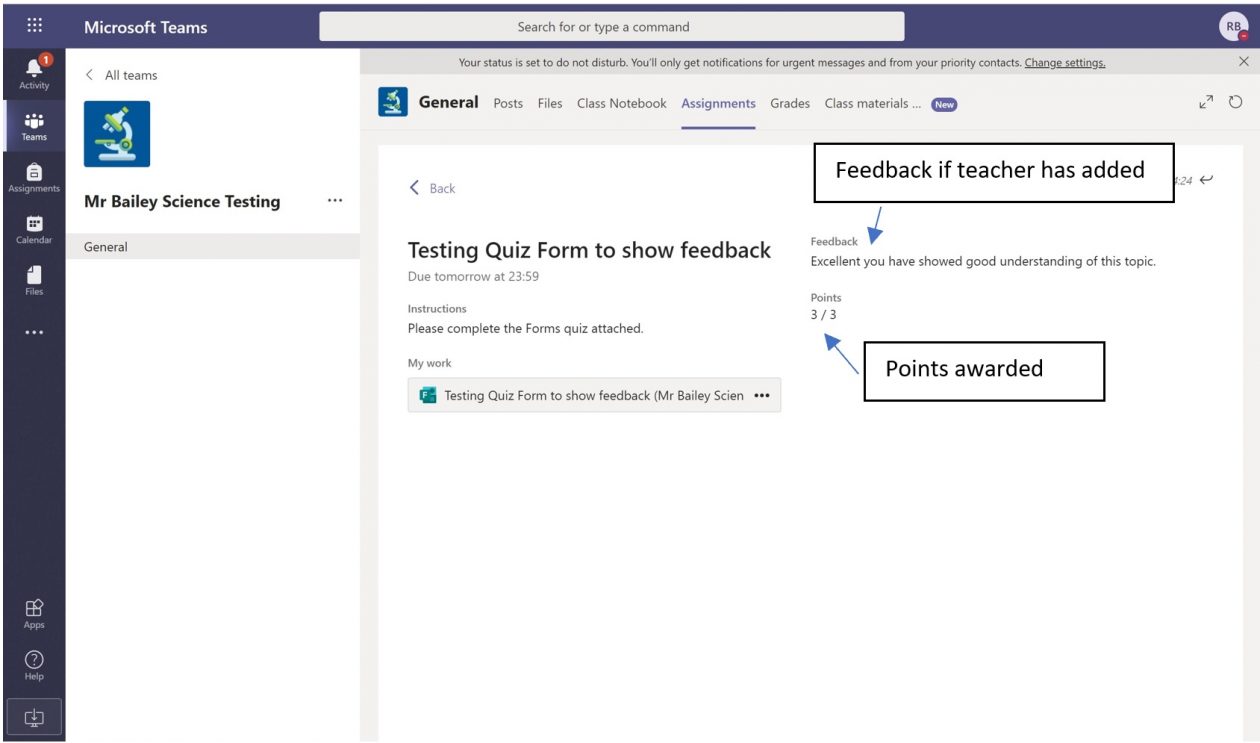
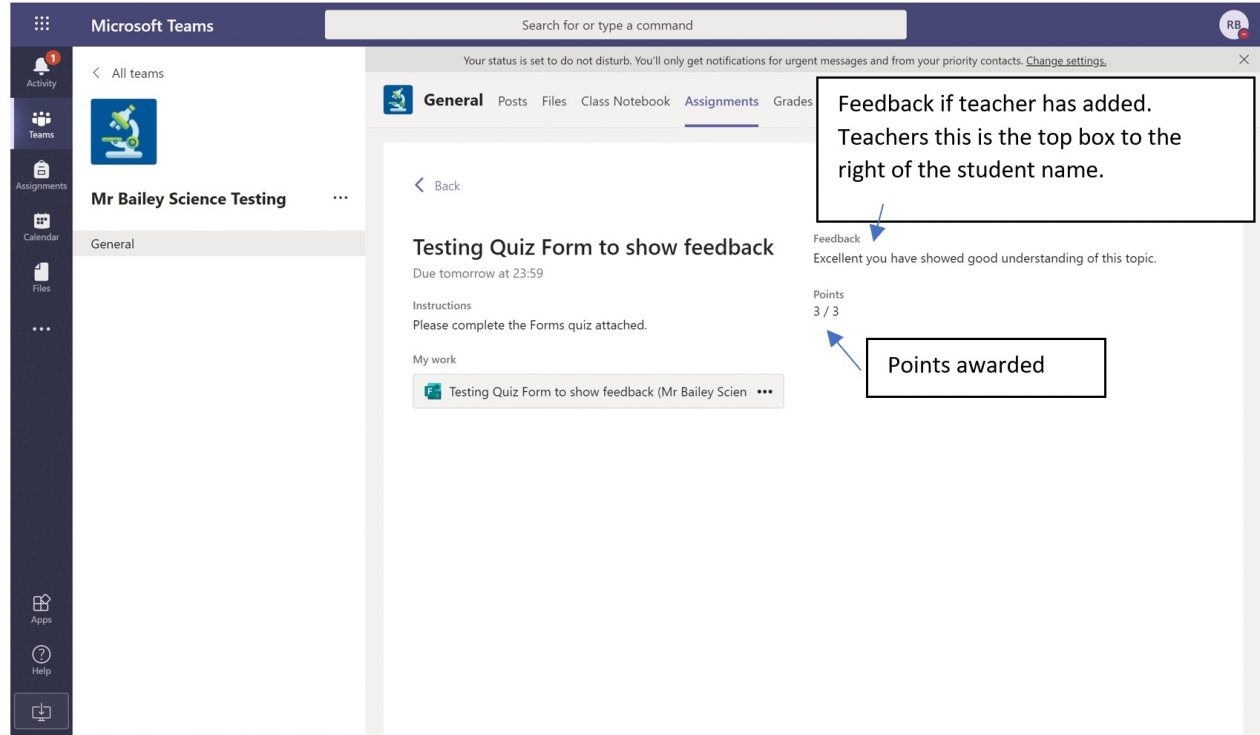
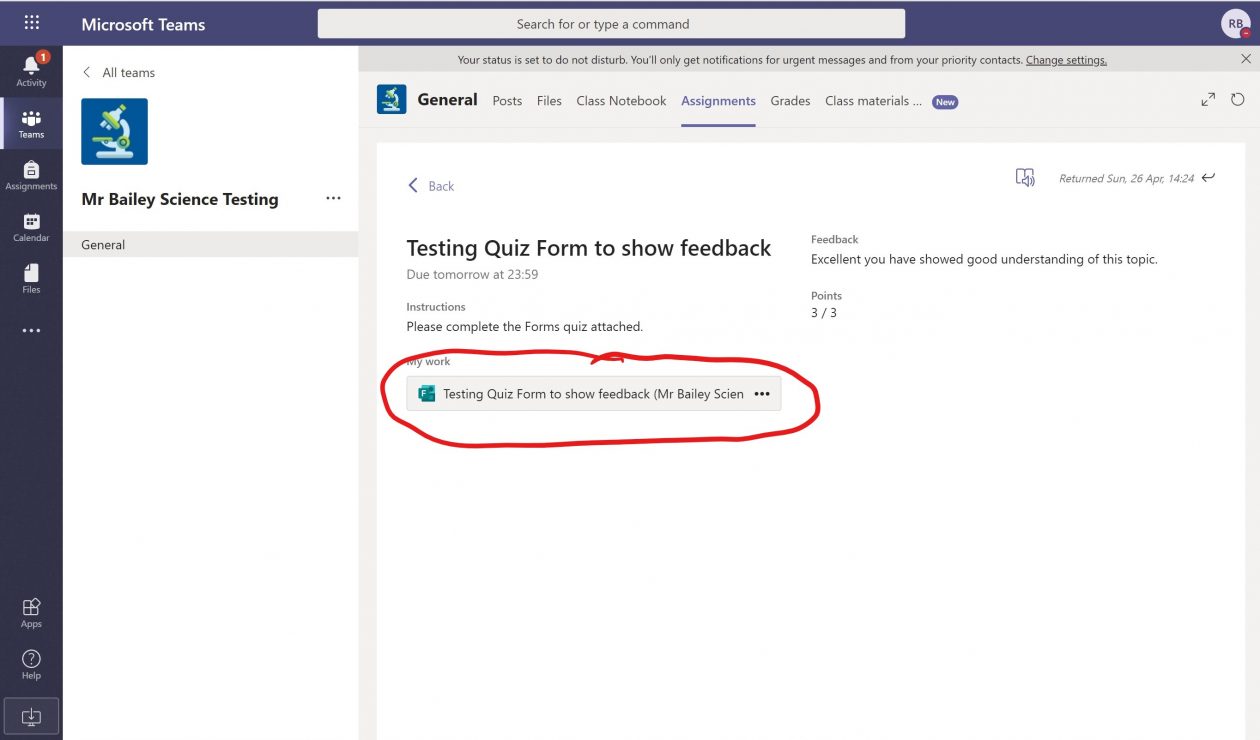
I am using Assignments to issue weekly work to all pupils. This means that each child gets their own editable document (Word, notebook page, spreadsheet, PowerPoint, etc.) that they can work on, complete and submit for marking and individual feedback. Pupils can clearly see what assignments they have outstanding and completed. Using the Grades tab they can also see their progress and scores for all submitted tasks. All of my Teams have a OneNote Notebook which gives each child a space to work.

screen clipping of notebook setup
OneNote Notebook Lesson Outline

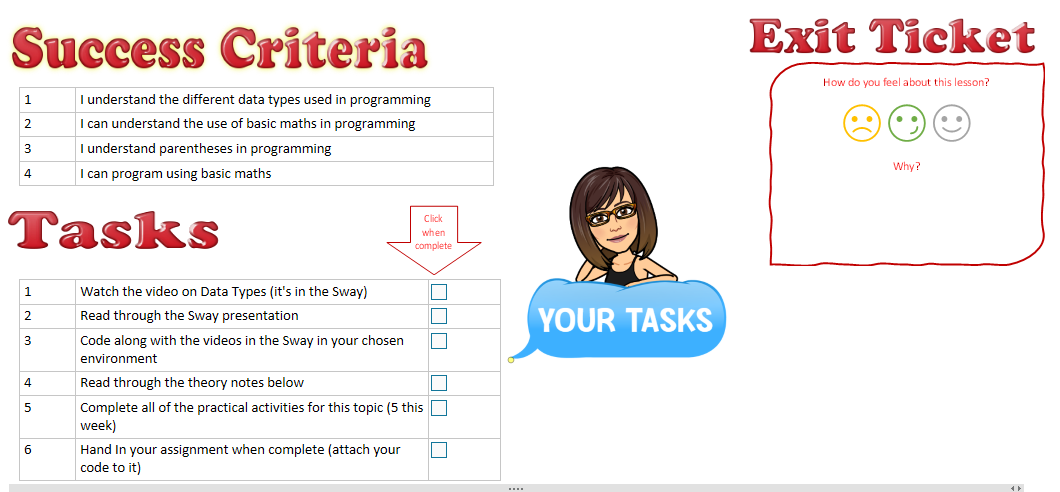
My organisation and layout of my notebooks has developed through remote learning. I now have clear Success Criteria, Tasks and Exit Passes to help the children see exactly what they need to do for each lesson and for me to gain feedback about how they felt about that lesson.

I have been teaching programming to my new S4 class. We started this when we “Moved On Learning”. At our school we code in Python and normally use our desktop PCs or Laptops in the lab, however, not all of my pupils have these devices at home. Some are using a tablet or their phone to complete work. Some have opted to download Python onto a device while others are using PythonAnywhere which is all done online. The actual Python coding is identical in both environments but the platforms themselves are quite different, therefore, I have been recording myself doing the tutorial tasks in both platforms and embedding these into a Sway each week. The pupils then watch the tutorial for the platform they are using.

screen clipping of python code in assignments
Python Code attached in Assignments

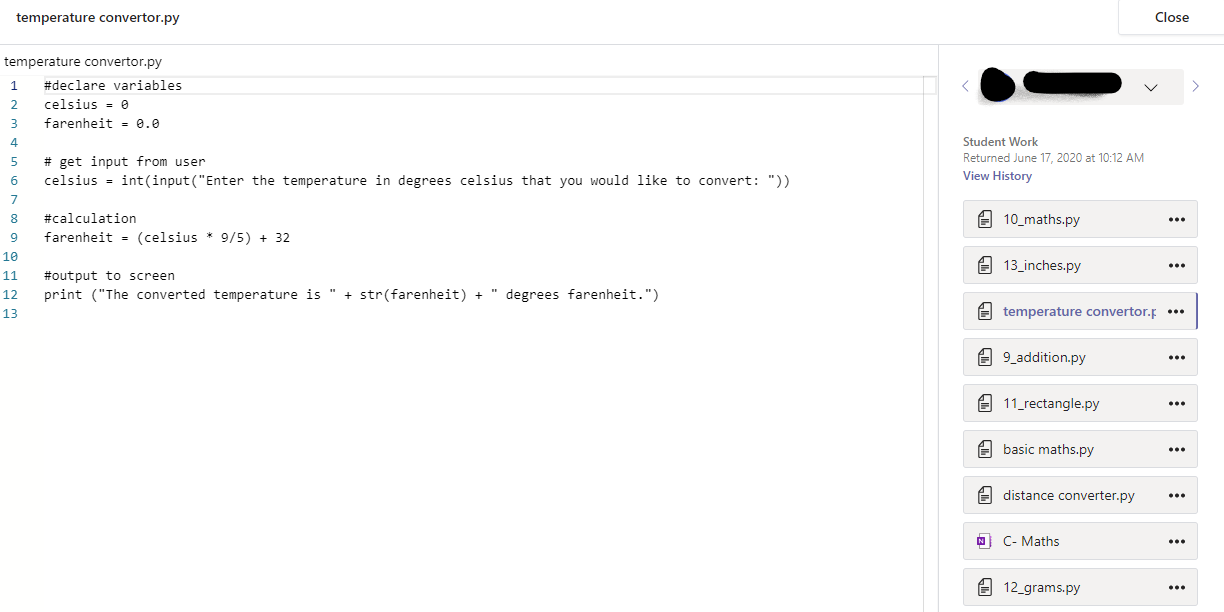
I was delighted when pupils were attaching their programs to their assignments when it showed me the code in the assignment window. I did not expect to see the code within the Teams assignment. This meant that I could view their code, mentally run through it to check that it would work but it also made discussing their code easier. Because I could see the code line numbers it made our discussions easier because I could state the line number in which they needed to revise. There were occasions where it was necessary to “show” pupils what I meant as communicating via keyboard was not always easy and I have started using Trinket for this type of thing. I can create Python code in Trinket and share it via a link with pupils to edit and experiment with which has helped them to see the differences between their code and mine. Trinket is another digital tool that I was unaware of prior to remote learning but will definitely continue to use.

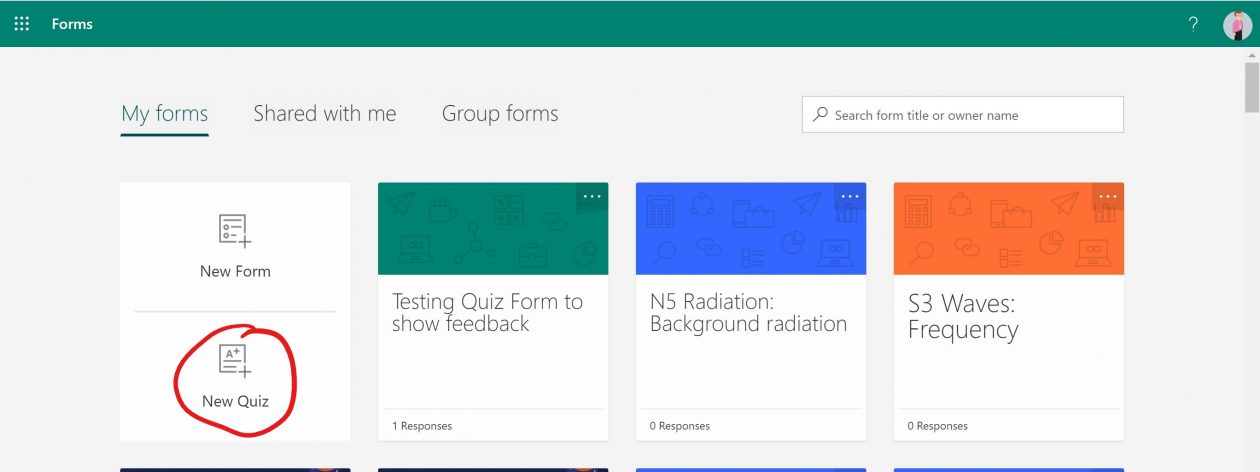
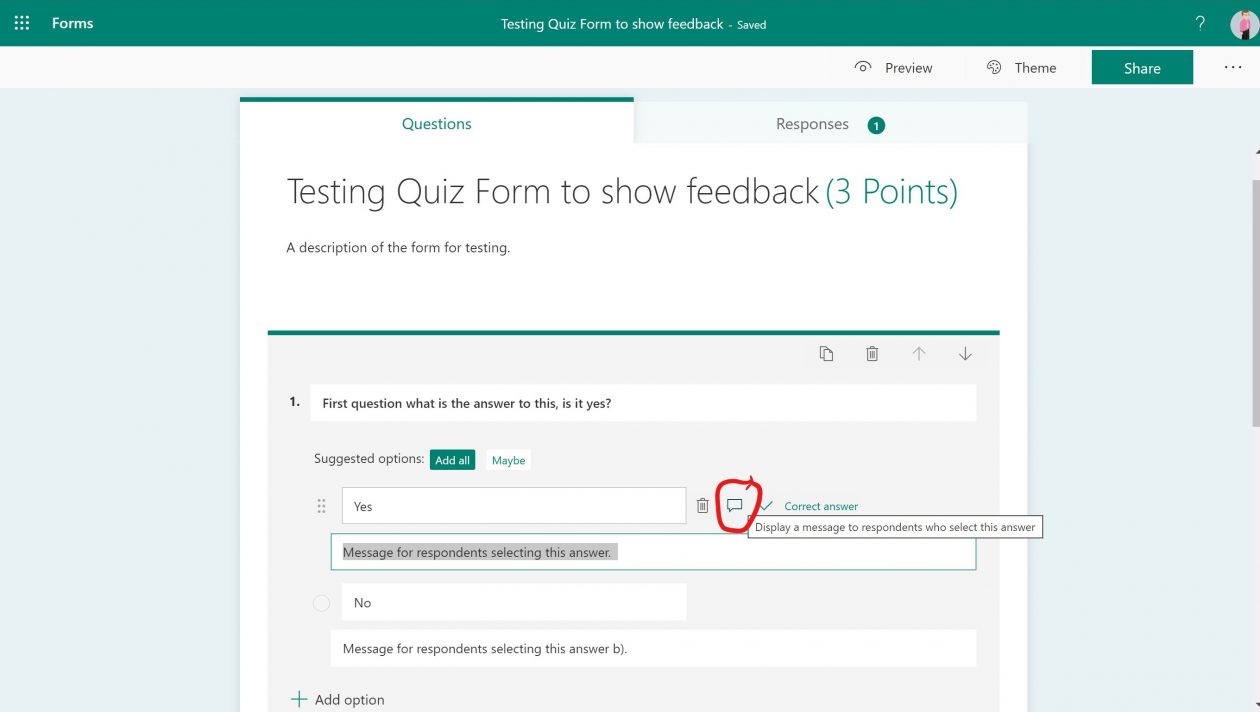
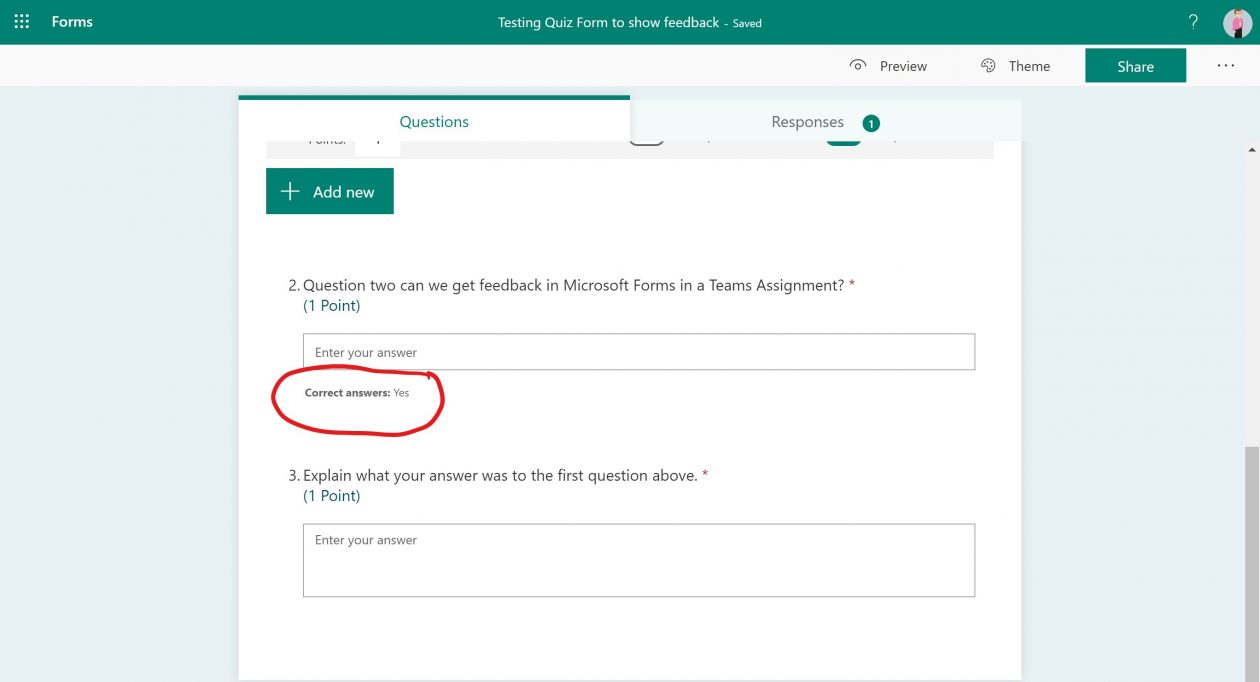
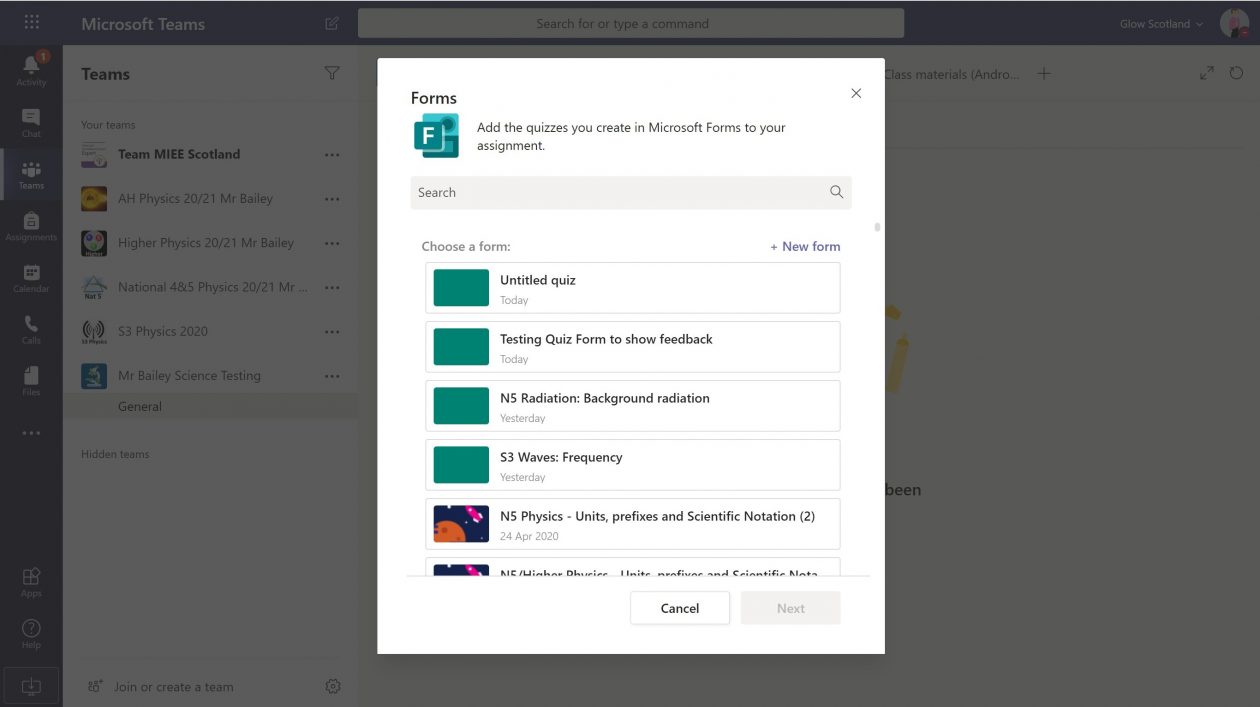
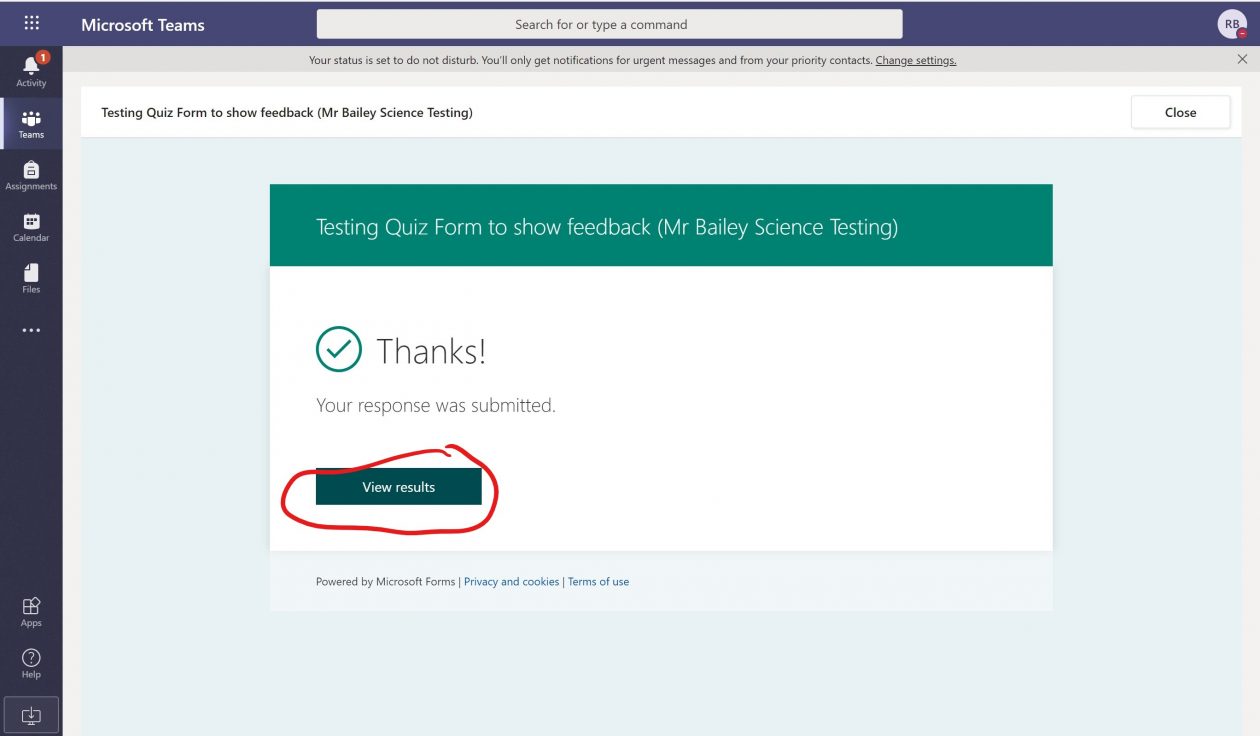
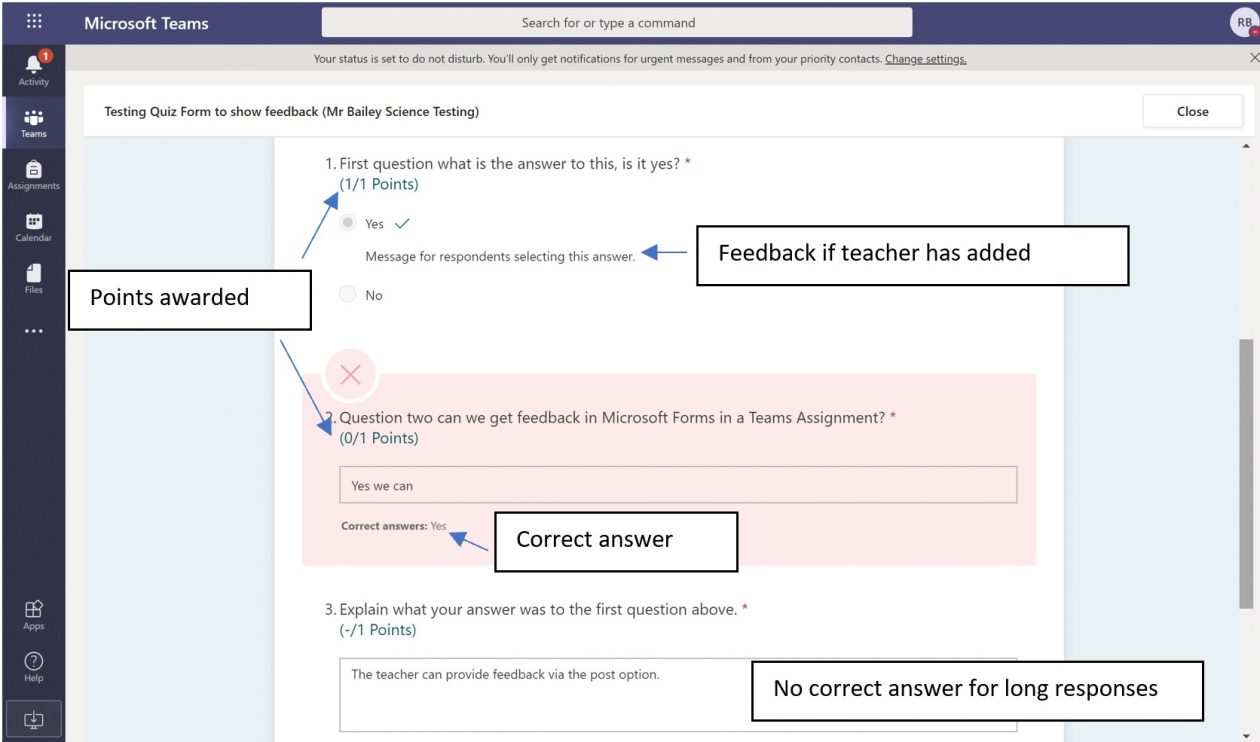
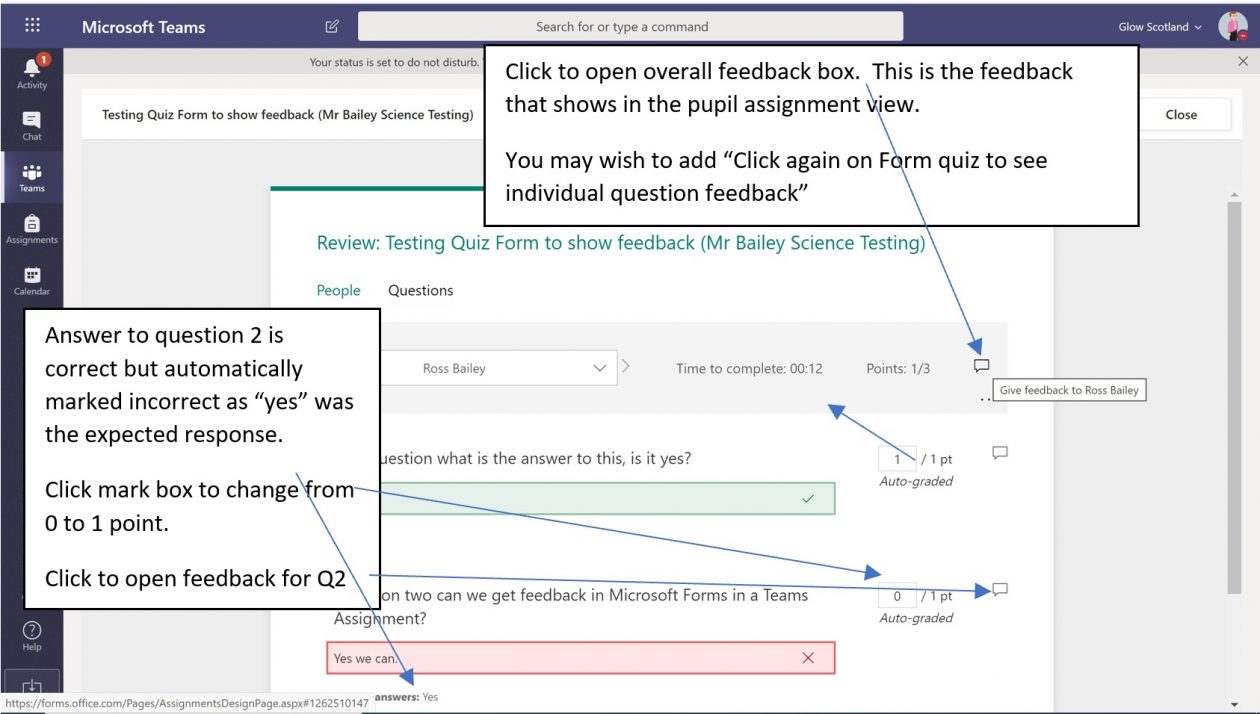
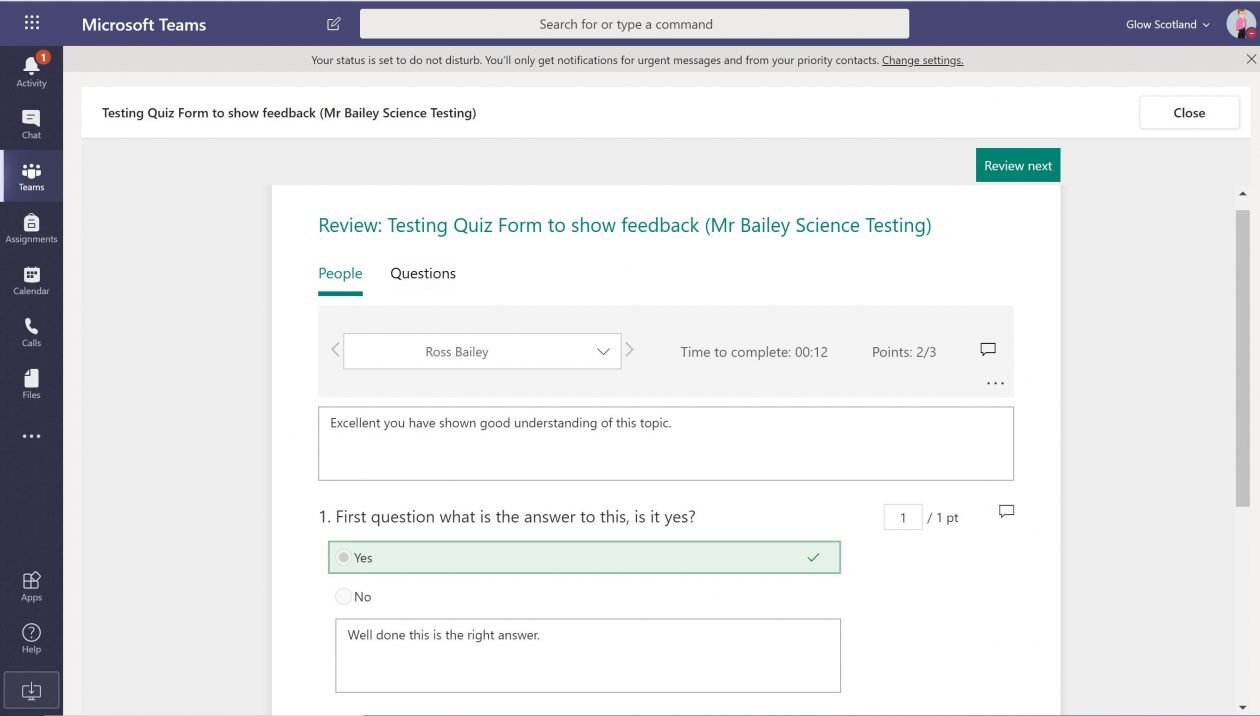
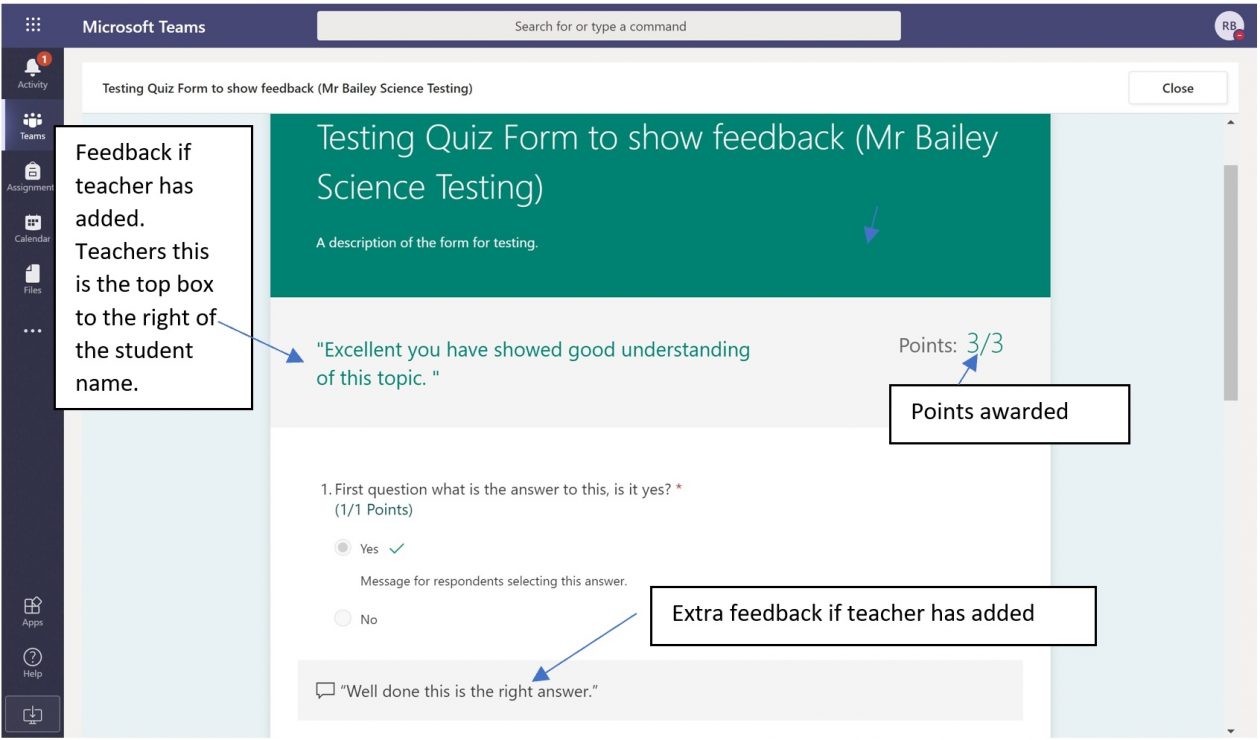
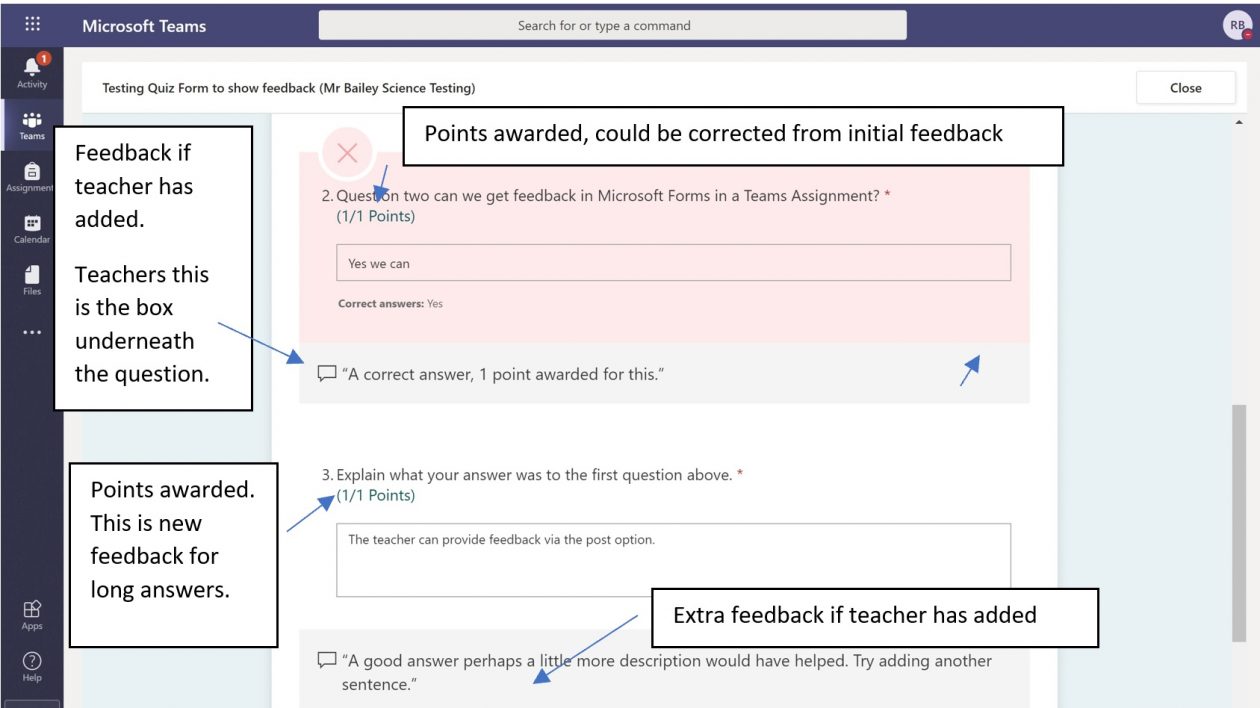
I have also been using Forms to create surveys and quizzes. Sometimes I have set these as the weekly work tasks on their own but also embedded these into Sways and OneNote Notebook pages depending on the task. This has allowed me to combine a variety of resources (theory, pictures, video and quiz) enabling all of the elements of that task to be in the same document making it easier for pupils to complete the work set for them.

praise given to Miss Mutter by a pupil

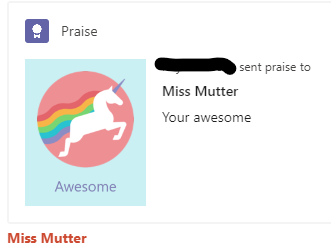
I have had positive feedback from pupils when issuing praise stickers for completing work, being kind or helpful to others in the team and have received praise from pupils myself. Which I must admit nearly made me cry. It was really nice to get this from pupils as it let me know that everything I had been doing was working, helping and appreciated.

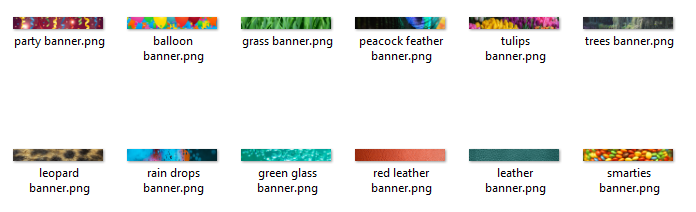
Other Digital Tools that I have been using to support teaching and learning during this time are  Wakelet, Flipgrid and Canva. I had been using Wakelet this year with my Higher Computing class. We had been adding online resources to it as we came across them building up a bank of revision materials as the course progressed. During remote learning I have been using it as a central point for storing staff training “How To” videos that I have produced. I have added the Wakelet as a tab in our whole staff team so that everyone can access it easily. As part of the staff CPD Training that I offered I created a Wakelet on making a virtual emoji classroom and shared it with staff to help them to create their own virtual classrooms. I have used Flipgrid to record ‘shorts’ (videos of less than 10 minutes) and shared these with pupils in my Teams. These short videos have normally been instructions on how to do something or a welcome to our team message from me. I have not used this app with pupils recording their own videos but this is something that I would like to be able to use in the future. I stumbled upon Canva during an online CPD session that I was taking part in during remote working. Canva is a design app that allows you to quickly design and create great looking publications either working from templates or from your imagination. I have used it to create certificates of appreciation for my pupil Digital Leaders, pupils submitting work, infographics, a twitter header image and various Teams announcement banners. All of your creations  can be animated, downloaded as pdf, image or video and shared with a link directly into my Teams, etc.

Announcement Banners
Announcement banners

My other roll during remote working has been training and supporting staff within my school with Glow, Teams, using Assignments, O365, ThingLink, Forms, Sway, Voice Overs in PowerPoint and OneNote Notebook. This has been great fun and very rewarding with staff sharing their successes and creations with me. Again reinforcing my original ‘silver lining’ from lockdown. However, I did say earlier that my view of that has slightly changed and it has – I’ve been so impressed by our pupils; taking part, sharing, asking questions and trying things out, however, in equal measure also by their parents and folks at home, supporting them (and me). I have received some lovely messages from them which has been greatly appreciated.

I have also achieved MIE Trainer status during remote learning. I had completed my own training for this way back in 2018 but had never tracked the training and support I had been providing to staff until now. Something else from remote learning that I will continue to do.

My silver lining now – the way in which pupils, parents and teachers have collectively engaged with Digital Tools and Technology for learning.

MIEE and Trainer Badges


You can find me on Twitter @FHSComputing

Microsoft Forms and feedback.⤴

from @ Digital Learning

This is a post to show teachers how to add feedback in Microsoft Forms and to show where pupils will receive and see that feedback.

Create a Microsoft Forms Quiz

Add questions, in each multiple choice question there is an option to add feedback to students choosing particular answers.  This is seen after a pupil submits the quiz.

For short answers there is an option to put in the correct answer for automatic marking.  For long answers there is not automatic marking response or feedback.


Now create the assignment with the forms quiz.  Choose quiz in the create assignments option.

Select the Forms Quiz you made earlier.

Add instructions, set which students, dates etc.  Then click assign or schedule if setting at a later date.

Pupil view

Assignment post appears in general channel and can be opened by clicking view assignments or can be accessed from the assignments tab.

Pupil clicks on attached Form Quiz.

Pupil completes Forms quiz

Clicks on submit.  After clicking on submit the Thanks screen appears and there is an option to view results.

The view results screen indicates points awarded and can indicate feedback for question responses “message for respondents selecting this answer” if the teacher added them into the form.

Correct answers for short answer questions are shown.  If the pupil answer differs this will be marked incorrect, it may be an acceptable alternative.

For long responses there is no feedback or mark at this stage.

If the pupil goes to the Grades tab in that Team they see that they have handed in this work.

Now the pupil waits for the teacher to put in their comments and feedback and return the work.

Teacher adds feedback

In the assignments tab, teacher can see pupil has handed in work.  To open the Forms quiz, they can click on handed in or Open in Forms.

In the Grades tab, teacher can see that work has been handed in as they see a score.  They can then click on the three dots …

If using from Grades, click Open Student Work to enter feedback and correct marks.

Don’t click return work or you will not have sent in any comments or checked their work and will not be able to add later.

When Microsoft Forms is open you can leave overall feedback by clicking the box to the right of the band that includes the pupil name.  This is the feedback that goes to the pupil assignment summary view.

You can click on the other questions and accept answers if they were correct and not marked correctly for short answers changing the points awarded.  You can leave feedback by clicking on the feedback option for each question.

Here is a view of some feedback for the overall section at the top and question 1.

For short answer questions we can correct the automatic marking if the pupil response was correct but not exactly the same as the correct answer.  If pupils are still to hand in you can go back to the Form and add other correct responses.  You need to go to Forms  then Groups then choose the Team Form you have set.  You can then click it open and edit the correct answer option for this question.

Longer questions are not automatically marked so you need to read the response and allocate marks accordingly. You can leave additional feedback under these questions.

Now you need to Post Scores for pupil to see the feedback you enter.  If you do not Post Scores the pupil will not see any of the comments.

A confirmation message comes up when Post Scores is selected.

The teacher view in the Grades tab now shows returned.

In the assignment tab the pupil moves from the To mark list to the Marked list.  Clicking on the toggle feedback option shows the summary feedback you entered in the Forms quiz and you see the total marks.

Pupil view to get feedback

Grades view in Team shows assignment has been returned to pupil and a points score.

To see the detailed information the pupil click assignment and goes to the completed assignments.

Or they can click on the view assignment post in the general channel.

Pupils see this, the points and the feedback added.  This feedback area can be blank if none was added by the teacher.

The feedback added here is from the overall feedback section (see teacher view).

Pupil clicks back on the attached Forms quiz.

Feedback is shown (if teacher has added more).

Here are some annotations of the feedback and where it comes from.

A video showing the process above, how teachers can provide feedback in Microsoft Forms.

A video showing how to view pupil feedback in Microsoft Forms.

Microsoft Tools on Glow⤴

from

UPDATE: The OneNote Notebook I used during my #TayMaths2019 workshop and the Scottish Maths Conference (Both the Stirling and Northern Conference) is available at http://bit.ly/2IShY5H. This contains the PowerPoint I used during these workshops.

As a Scottish (Maths) Teacher, I have access to Glow Scotland. Within Glow, teachers have access to Microsoft tools such as Teams, OneNote, Forms and Sway. In this blog post, I will introduce you to each of these, link to examples of each and get you started on using these tools in your own practice.

I have presented a workshop on this at the Scottish Mathematical Council’s Conference (9th March 2019), and will be talking about it at the first Tay Collab Maths Conference on 23rd March 2019 and now at the Northern Conference on 04/05/19.

Using these tools is soon going to become an even more massive part of my work, as next month I am taking up post as PT Mathematics at Bertha Park High School in Perth, the UK’s only Microsoft Flagship School. Here’s a flavour of what the Microsoft tools on Glow have to offer…

OneNote

Let’s get started with OneNote.

OneNote is excellent.

If you’re not using it yet, you really should be.

OneNote allows you to store and share absolutely any type of digital content.

Notebook – This is the full OneNote – it contains all of the sections and pages.

Section – A section is the first level down within a Notebook. This particular Notebook you are looking at has two sections. The one you are in just now is called “Microsoft Tools on Glow”. The other one is called “Other Section”, and contains only one page, which has not yet been used.

Page – The level you are at right now, where I am typing this text and where you are reading this text is called a Page. Pages can be extended in all directions, indefinitely.

Every Notebook can have as many Sections as you like and every section can have as many Pages as you like. There’s no limit other than, I guess, the amount of storage you have in OneDrive, which is where the Notebook is saved.

Creating a new OneNote Notebook

Sign into Glow, open OneDrive and Click on New – this lets you create a new OneNote Notebook in the folder you are currently in on your OneDrive.

1 New OneNote

This will create a brand new OneNote Notebook, ready to be populated with whatever you want to populate it with.

Sharing your OneNote Notebook

To share this Notebook with you, I clicked on the three dots next to the Notebook’s name and clicked Share:

2 Share

This box appeared:

3 Link

And I clicked on the wee arrow next to “Only the people you specify who have this link can edit”

4 Anyone With

And clicked on “Anyone with this link”

5 Anyone With

Then, when you hit apply you can copy the link to the OneNote

The link looks like this: https://glowscotland-my.sharepoint.com/personal/gw13allanmichael_glow_sch_uk/_layouts/15/guestaccess.aspx?e=teEuB9&share=Ehg-FsOTQm9CuKmUJx9vpK4BIObzLZ_rk1xqLdGlmLIS5w&cid=b3c0792d-5bc6-485a-bc5d-34ecf54da6de

That’s not easy to jot down, or remember, so I used bit.ly to create a shortened link.

The shortened link is http://bit.ly/2IShY5H

If you want to create a OneNote Notebook and share it with a whole class, it’s probably going to be easier to use Teams…

Teams

Microsoft Teams will change the way you work.

If you’re familiar with Edmodo, Schoology, Show My Homework etc, you’ll find Teams easy to use. Even if you’re not, you’ll find Teams easy to use, because it’s really easy to use!

Watch this short video for an intro to Teams: https://support.office.com/en-us/article/video-welcome-to-microsoft-teams-b98d533f-118e-4bae-bf44-3df2470c2b12

To create a Team (and this can be staff only or Teacher and pupils) your best option is to Download Teams (it’s free). https://products.office.com/en-us/microsoft-teams/group-chat-software

If you work in a Scottish School, chances are Teams is already on your work computer.

Once you open up Teams, sign in using your Glow username and password.

This is what it looks like when I sign in:1 Landing

You can see I am a member of 3 Teams (GHS Maths, Team MIEExpert Scotland and Bertha Park High – PT Team)

To create a new Team, you click on the button near the bottom left that says “Join or Create a Team” You’ll then see this:

2 Join or Create

If you want to create a Team, then it’s obvious which button to click. If you have been invited to Join a Team (and have been given a code) then that’s obvious too.

When you choose “Create Team” you’ll see this:

3 Team Options

Choose whichever option you need. I’m going to create a Class. Give your class a Name and description (if you like).

4 name Team

You can then add students and other teachers to your Team:

5 Add People

Once the Team has been made, you can do a few things with it. Best to play around with these options and see what happens when you press the different buttons. Most of it is pretty obvious.

6 Manage Settings

Clicking on “Manage Team” and then hitting “Settings” shows this page:

7 Settings

You can then create a Team Code by clicking “Generate Code”

8 Join Code

Feel free to join my class (you know how to do that if you read the bit above)

At the top of the Team, when you are in “General” you can set up the Class Notebook. This is the OneNote Notebook for your Team.

9 Set up Onenote

When you click on “Set up a OneNote Class Notebook” you will be walked through the process. You can customise the Notebook so that it has all the sections you want it to have.

There’s a video here that will show you (pretty slowly) how this works: Teachers – Get Started with OneNote Class Notebook Creator

My OneNote Class Notebook has been created, ready for using with the class.

91 Open In OneNote

I have one pupil in the class (Isaac Newton) but if I had more, they would be listed below. I find it a lot easier to work with the OneNote Notebook in the full desktop version of OneNote, so I click on “Open in OneNote” at the top of the screen.

The types of content you might put into the OneNote is entirely up to you. I have an Example OneNote Notebook that you can take a look at here: bit.ly/MathsOneNoteTeachers

Using OneNote as a Planner

I have blogged about using OneNote as a planner. I no longer use a physical planner, instead choosing to use OneNote. You can find out how to set up your own Planner OneNote here: https://mrallanmaths.wordpress.com/2018/12/03/using-onenote-as-a-planner-a-few-years-on/

Immersive Reader

Immersive Reader (also known as Microsoft Learning Tools) allows pupils with additional support needs to access text in a fully supported way. The support is customisable, and the best way to learn about it is to give it a go.

You click on “View” in the toolbar then select “Immersive Reader”

This is available in OneNote, Word, PowerPoint and so on.

Sway

Sway lets you create interactive newsletters, and much more.

Here’s how to get started.

Log into Glow and open up OneDrive. You then want to click on the 9 dots at the top left of the screen:

1 Waffle

And select Sway:

2 Sway

You can then choose to start a New Blank Sway:

3 New Blank

To begin with, the Sway looks pretty boring, but you need to put some content in and choose a design:

4 Title

I’ve given it a title and written a little bit of text and added a picture:

5 Some text

Now I’m going to choose a Design.

Click on Design in the top left corner then Styles in the top right corner:

6 Design

Pick a design you like:

7 New Design

Then click “Play” in the top right:

8 Play

You can view the Sway here: Sway

Here are some more examples of Sways that you can take a look at:

Glenrothes High School Pupil Equity Fund Update: https://sway.office.com/t4Xy1SIHNRV94wmn?ref=Link

Bertha Park High School Winter Update: https://sway.office.com/dOuvWTYJz8KIOsED?ref=Link&loc=play

N5/Higher Maths Revision: bit.ly/MathsRevisionN5H  (This one is worth sharing with pupils)

Forms

Ever used Survey Monkey? Well there’s a better version of that available from Microsoft and it’s called Forms.

You can use Forms to get feedback from pupils/parents/staff for any number of things.

You can also use it to build Quizzes that can serve as assessments.

To access Forms, you click on the 9 dots at the top left in OneDrive:

2 New Form or Quiz.png

“New Form” lets you make a survey. “New Quiz” works in pretty much the same way, but you also can assign points to each question and select correct answers.

The best thing to do if you want to learn more about using Forms it to use this link here: https://education.microsoft.com/courses-and-resources/courses/forms

Sharing with people outside Glow or Pupils/Staff who don’t know Usernames/Passwords

Ideally, the solution to this is to get staff and pupils to just remember their passwords. However, I have found it useful to be able to share links that work without signing in.

I use bit.ly to create shortened web links. If you sign up for a free account your can customise the links. Paying for a subscription allows you to edit and delete links once you’ve made them – I haven’t bothered to do this.

Learning More / Getting Help

You will find lots of free courses available here: https://education.microsoft.com/

Log in using your Glow username and password and you can build up a profile and collect points and badges once you have completed the courses. It’s the best way to learn about the Microsoft tools available on Glow apart from this Blog post!

OneNote intro: https://education.microsoft.com/Getting-Started-with-OneNote

I hope you found this useful.

If you have any questions that you think I might be able to answer, do get in touch on Twitter or in the comments below.