Tag Archives: 3D

Build it in Microsoft Paint 3D⤴

from @ Digital Learning & Teaching in Falkirk

Microsoft Paint 3D on Windows devices provides a handy tool for creating, remodelling, manipulating and sharing 2D and 3D images. And if you’ve seen it on your Windows device but not yet explored it, then the links to resources below will show you how to make use of the Paint 3D tools and features, but …

MERGE Cube – bringing the virtual into the palm of the hand⤴

from @ ICT for Learning & Teaching in Falkirk Schools

MERGE cube – lets the teacher or learner move a 3D object as if it’s right there in their hand! A 3D viewer app (for Apple or Android devices) which can let you move the object round and over, letting you interact with it, all while viewed through a tablet device or projected onto a classroom screen. Whether it’s an inanimate historical object, which viewed in 3D lets you turn it round, look underneath, zoom in closer to examine details, or a simulation or game which lets you interact with the scene, changing what happens as you make choices.

You can use the MERGE cube with a wide range of resources created by others elsewhere (as can be found on MERGE Miniverse or shared in Co Spaces), or a teacher or their learners can create their own virtual 3D objects or environments using Paint 3D or TinkerCAD (once you’ve created a 3D object or scene in TinkerCAD simply use the save-as option to save as a stl format file, then upload this to your Miniverse account, from where you’ll be able to then share the code to view in the MERGE object viewer app, or Open your Tinkercad design, click “Send To”, then choose “Object Viewer for MERGE Cube”), or even use the Qlone app to scan a real object to convert it into a virtual object, all stored in Co Spaces online so that a user can access the shared virtual creation simply by entering the code and downloading to the app.

So how do I get started?

  1. First you need a MERGE cube. Once a teacher has registered a free MERGE account, verified the email address and entered one activation code (which is included with the MERGE cube), you will be able to log into  multiple different devices with that email, and without the need for additional activation codes. You can create your own additional MERGE cubes from paper or card just by downloading a template (click here for a printable pdf of each of the faces of a MERGE cube by Jaime Donally which you’ll be able to print and stick onto a cardboard cube – you can also use this to try out a MERGE cube before purchase) which you can print out, cut out and fold into a MERGE cube – click for a printable net by Clint Carlson of the MERGE Cube faces  (you can also enlarge these templates to any size of cube – click on this video to view Gabe Haydu showing how to make an enormous MERGE cube from cardboard):

2. Then you need the app MERGE Object Viewer app on a tablet device to view MERGE cube 3D creations – the MERGE cube is compatible with a wide range of devices (click here for information about devices).

3. View the 3D creations included in the MERGE Object Viewer app – or sign up for a Miniverse account or CoSpaces account where you can find 3D objects/environments created by others – then all you need to do is take a note of the shared code for the object you wish to view, type it into the MERGE Object Viewer, wait for it to download and then start interacting with the 3D creation. Click on this link for some additional Object Codes ready to try on your MERGE Object Viewer app

More help for getting going?

Click here for  MERGE cube getting started guide on the Miniverse website

https://miniverse.io/cube-start

This getting started guide takes you through the same steps as above with additional videos as well as further information which may be helpful.

So how can a MERGE cube be used in the classroom?

There’s a host of places to have a look at how others are using a MERGE cube in a classroom setting. Click on the links below to browse to find something which might spark the imagination of your learners and fit in with what you’re planning to teach:

  1. Miniverse.io – browse through the range of Miniverse MERGE cube experiences https://miniverse.io/cube
  2. MERGE Educators Facebook group https://www.facebook.com/groups/mergeeducators/
  3. MERGE Educators Activity Plans https://mergevr.com/edu-resources
  4. MERGE VR on Twitter https://twitter.com/mergevr
  5. Guide to the MERGE Cube in the Classroom – presentation by Mary Howard
  6. #ARVRinEDU – a hashtag in Twitter where anyone can share examples of the use of VR or AR in education, including the use of MERGE cube.


Cardboard Camera⤴

from @ John's World Wide Wall Display

(This post has been sitting in a text file over the whole of the Christmas break)

A while back a blogged about my classes brief experience of Google Expeditions one of the things I didn’t mention was the thought that it might be interesting for children to be creators of content.

The other day I was reminded of Google Expeditions by Malcolm Wilson’s post <a href=”https://blogs.glowscotland.org.uk/fa/ICTFalkirkPrimaries/are-we-really-there-virtual-reality-in-the-classroom/”>Are we really there? Virtual Reality in the classroom</a> which gives a great overview of VR & Google Expeditions. He also posted some links. I’ve not followed them all but one leads on to Cardboard Camera on the App Store. This is a google iOS app (there is an android one too) that can:

Capture and share moments with virtual reality (VR) photos. VR photos let you experience scenery and sound in every direction and in 3D, making things near you look close and faraway things look far away.

I’ve only had time to give it a couple of quick tests on my phone. The one I made in the class certainly seemed to impress the pupils when viewed in Google Cardboard.

The app saves at an image with a .vr.jpg extension in the camera roll as well as the app. When imported to photos on a mac this turns out to be 10994 pixels by 1706 and weights in at 4.9 MB. You can see an exported & much reduced version below.

As you view the image you can hear the sound recorded at the time. So You can either have atmosphere or a voice over.

According to the app store:

Compatibility: Requires iOS 9.0 or later. Compatible with iPhone, iPad, and iPod touch

I wonder if it is worth having an iPod Touch in class. I have always been slightly surprised that iPod Touches disappeared from the education scene when the iPad came along. The fact that they should work in google cardboard or other VR viewers might bring them back?

Featured image screenshot of the Cardboard Camera in action.

    Are we really there? Virtual Reality in the classroom⤴

    from @ ICT for Teaching & Learning in Falkirk Primary Schools

    So what is Virtual Reality or VR?

    img_9516Virtual Reality, or VR, provides a means to have an experience of a location or object (whether real or imaginary) through a mobile device, often viewed through a headset, in such a way that when the viewer moves around they see the virtual view moving with them. So the images are usually 360 degree images and can be in 3D so that when viewed on a mobile device within a headset with twin lenses it appears to the viewer as being  as close to being there as possible. When you move forward, tilt your head, look up – it’s as if you are doing the same in the virtual reality experience.

    What are the options for the classroom?

    The least expensive option for using Virtual Reality in a classroom would be Google Expeditions using Google Cardboard viewers (while they can be viewed without a twin-lens 3D viewer the viewer will lose the feeling of 3D) which are held by the hand up to the eyes. More expensive options are available with a variety of VR viewer headsets (such as Microsoft HoloLens, Gear VR or Oculus Rift headsets) and accompanying sensors (often handheld) so that the experience can involve touching or interacting with objects within a VR experience – as you approach or touch something in virtual reality it will react in a way as it in real life.

    Google Expeditions with Google Cardboard Viewers

    img_9526Google Expeditions are virtual reality experiences designed with a classroom guided exploration in mind. The teacher downloads the choice of virtual reality location using the Google Expeditions app and starts the expedition. Then when the pupil on the same wi-fi connection starts the app on their device they will see the teacher-directed expedition awaiting them.

    In Google Expeditions the teacher application provides suggestions for questions or directions to guide learners as they explore the virtual environment. The teacher can see on their mobile device app where the learners are exploring on their screens, and can make suggestions as the learners explore.

    The video below is a promotional video for Google Expeditions in the classroom giving a brief overview of what it looks like in a classroom setting where a teacher with a tablet device guides pupils each holding a Google Cardboard headset viewer.

    How do I get started using Google Expeditions?

    The video below is a guided tutorial to using Google Expeditions

    How do I use Google Expeditions with iPads or Android tablets?

    The video below shows how Google Expeditions can be viewed on iPads rather than smartphones. Many school may already have iPads or Android tablets, and the Google Expeditions apps will work on these too. However the Google Cardboard viewer is designed with the size of a smartphone in mind. If you wish to use the app on an iPad or Android tablet then when running the setup at the point where you see the two images side by side there is a small icon at the top right which lets you change the twin view to single view. Having done that the view will no longer be 3D and will no longer be held up to the eyes of the viewer but simply handheld.

    How to use Google Expeditions on iPads or tablet devices in the classroom

    Where can I find Virtual Reality Experiences for my classroom?

    Google Expeditions provides a superb source of Virtual Reality experiences ready to be downloaded for use on devices in the classroom.

    discoveryvrDiscovery VR provides a wide range of downloadable virtual reality experiences in an educational context. Each is available for specific devices and come with notes for use by the educator with their class to guide their learners in the exploration of the experience.


    Ideas for using Virtual Reality in the classroom

    edtech4beginnersvr10ideas10 Simple Ways to Use Google Cardboard in the Classroom – a post by Neil Jarrett on the EdTech4 Beginners blog describing different ways in which the virtual reality app Google Cardboard can be used in the classroom.

    whiteboardblogideasforvr

    Ideas for using Google Cardboard Virtual Reality in the classroom – a blogpost on the Whiteboard Blog by Danny Nicholson

    What Virtual Reality experiences have you used with your class?

    Please share how you have used virtual reality experiences with your class by adding a comment below


    Google Expeditions⤴

    from @ John's World Wide Wall Display

    IMG_7357.jpeg

    In early October my school had a visit from Google Expeditions. I’d been contacted to see if I would be interested and jumped at the chance.

    Google Expeditions are a 3D VR ‘experience’ using google cardboard. I’d tried a few mobile apps using cardboard before but not in a classroom setting.

    The plan was we would choose Expeditions that would fit into our learning.

    On the day Kostas from Google turned up in Banton having traveled on public transport with the whole kit in a backpack. This consisted of one tablet, one router, a set of android phones with a google cardboard for each phone.

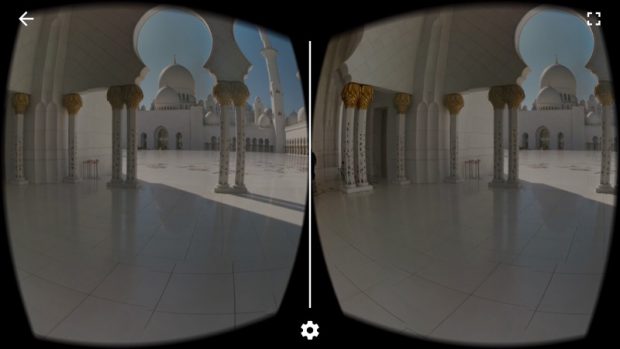
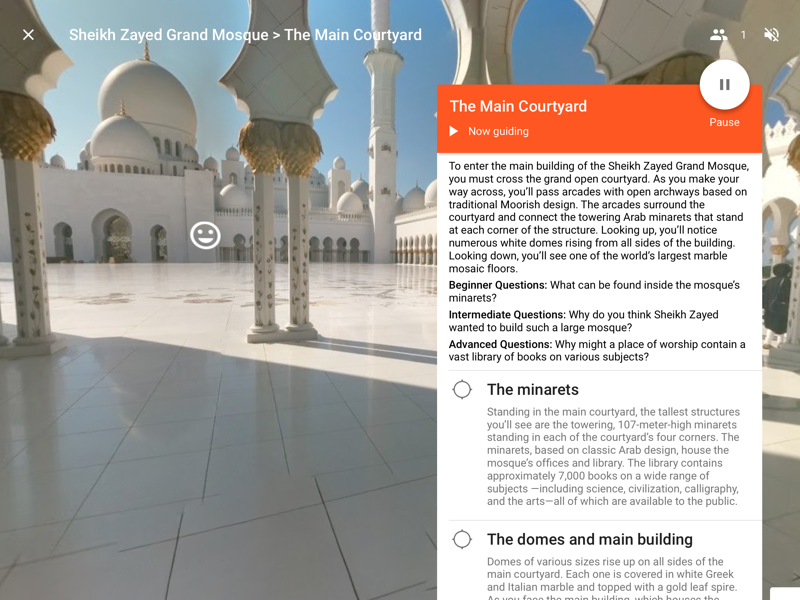
    Expeditions are a set of several 3D VR ‘images’ that can be looked around. The images are broadcast from the tablet ( or a phone) to other devices on the local network. The Tablet is handled by the ‘leader’ the phones by the ‘explorers’. The leader controls which image/space the explorers see. The leader’s non-3D view includes some notes and discussion points.

    table leader view

    The devices need to be connected to the same network but they do not need to be online. The scenes are ‘served’ from the tablet. The tablet does need to be online at some point to download the scenes in preparation.

    When in a space the explorers can look around by turning their heads or bodies. Moving forward and backwards has no effect.

    The leader cannot control where the explores look in a scene but double tapping will show the explorers an arrow pointing to the object tapped (we saw that explorers would always follow these arrows).

    We had chosen a couple of Expeditions that would fit with out learning, but did have the chance to explore quite a few.

    in the box

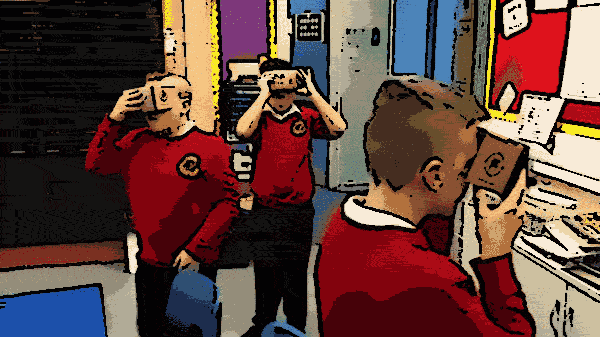
    The pupils were very engaged immediately, the images are surprisingly ‘hyper real’ and the experience of turning round or just moving your head was delightful.

    We collated some pupil responses on the class blog: Around the World in a Cardboard Box.

    I’d chosen the spaces we looked at at fairly short notice, one did not really fit with my expectations the other was linked to a topic we had not then started. So for the point of view of linking into the learning and teaching I hadn’t planed well enough. From the point of view of exploring potential new technology and giving the pupils a glimpse of the near future.

    I’d also feel that the resources might be a bit more valuable after the initial excitement had died down and the pupils used the system more than once.

    So how would we use this past an exciting but brief test. Although the kit is relative inexpensive a class set would still be an major resource for even a large school.

    I suppose it could be a share resource for a group of schools or local authority.

    I wonder too if it could be used on a smaller scale, with less devices. At the end of last month I was talking to Will Tuft on Radio #EDutalk about ‘The immersive classroom’, this involves setting up classroom experiences, for example the aftermath of a hurricane, with props and tasks. I wonder could the cardboard be part of some such class. For example a group of ‘divers’ could take it in turns to put on the googles and explore the sea.

    It could also just be used by a few children as a time.

    I wonder if as well as the obvious exploration angle if it would be a rich resource for writing.

    All in all an interesting experience, it will be interesting to see how this type of technology develops.

      Build it in 3D with Tinkercad⤴

      from @ ICT for Teaching & Learning in Falkirk Primary Schools

      TinkerCAD-logoWhat is Tinkercad?

      Tinkercad is a free online tool for creating images which can be rotated and viewed on screen as if in 3D from different angles, and which can also be used to send to a 3D printer to create real physical objects. Tinkercad is designed to be used by any age, whether for a simple or complex object, to make a toy or a design prototype, jewellery or ornament for the home. And even if you don’t make the physical object there is a lot of design skills and satisfaction which can be gained just by using the tool to design a virtual object.

      If you can imagine the object in your own mind Tinkercad provides the tool to let you create it in reality. And as it is browser-based it only needs a user to be on the Internet to be able to sign up for a free account and to start a design, and continue anywhere they can get connected online – there is no software to download.

      How do you get started using Tinkercad?

      Here’s a video which gives an overview of Tinkercad:

      A search on YouTube for “Tinkercad tutorial” lists a vast array of videos by Tinkercad users showing how they have created a wide range of objects, so that others can be inspired to get their own creative juices starting to flow. Tinkercad also has its own YouTube channel with a range of videos showing how to use the tool for a multitude of model-making requirements so that there is no need to start from scratch – someone will have created an object from which another user can adapt to get what they are imagining.

      TinkerCAD-tutorial

      Tutorials in using Tinkercad – there are video tutorials showing how to get started using Tinkercad and how to use the tool to refine and customise the models being created. These tutorials are interactive in that you are guided through the steps while you are using the tool so everything is shown on screen at the point where you need the guidance.

      There are many videos showing how to make basic models, as well as objects which could form the basis for objects by others and which therefore just need customising to suit the user’s needs.

      How are other people using Tinkercad?

      Tinkercad has its own blog which provides illustrations of how other people are using Tinkercad, and shares advice about the process users went through, and what they did with their creations.

      http://blog.tinkercad.com/

      How might Tinkercad be used in the classroom?

      Project IgniteTinkercad Project Ignite provides ideas specifically aimed at using Tinkercad in the classroom. This provides a means for teachers to create a class without the need for pupils to sign up with an account, but instead use a teacher-created sign-in code. And of course there are hosts of projects, with supporting resources, for engaging classroom activities using Tinkercad.

      https://projectignite.autodesk.com/

      DensRoadNurseryDens Road Nursery in Dundee have a blogpost on the Create blog detailing how Tinkercad has been used in their early years setting.


      What if I don’t have access to a 3D printer?

      Tinkercad produces files in a format which a 3D printer can translate into a 3D physical object. But if you don’t have access to a 3D printer then you may wish to consider sites such as Shapeways which lets you upload your file and they will calculate and quote a cost so that you could decide to have it created and sent in the mail to you. http://www.shapeways.com/create

      How are you using Tinkercad?

      How are you using Tinkercad? Do please share in the comments below this post